 Macramé stripe—Arabic subject.
Macramé stripe—Arabic subject.
Macramé stripe—Arabic subject.
Macramé is an Arabic word, signifying an ornamental fringe or trimming, which has been adopted as the term for a certain kind of hand-work, known also as «knotted fringe» or «Mexican lace» and produced by the knotting, interweaving and tying together of threads.
We have given the preference to the Arabic name because of its less definite meaning, seeing that not only fringe and lace, but trimmings of all kinds, in the shape of bands and stripes and headings, can be worked in macramé.
Until its revival about ten years ago, when it was regarded by many as a new invention, the art of macramé making had for centuries become almost extinct and save here and there in the convents, was quite unknown.
The multitude of uses to which it can be turned as a trimming, the infinite variety it admits of and its great durability and strength, make macramé well worth a study; the difficulties that repel many at first sight are only on the surface and any one who carefully follows the instructions given in the following pages, will soon overcome them and be able without pains to copy the charming designs that accompany them, which remind us of the wooden lattices in the windows of Eastern houses, doubtless familiar to many of our readers, under the name of moucharabieh.
Materials.—These may be of almost any kind; silk, gold thread, cord, wool or cotton, can all be employed with good effect. Almost any of the D.M.C cottons can be used for macramé; but the ones especially to be recommended are: Fil à dentelle D.M.C[A], Cordonnet 6 fils D.M.C[A] and Coton à broder D.M.C[A] for the finer kinds of work, and for the coarser, Fil à pointer D.M.C[A], Coton à tricoter D.M.C[A] and Ganse turque D.M.C[A]. The twist in all these is so regular as to admit of a high degree of perfection being attained with them: they are moreover very agreeable to the touch, a great recommendation considering how much they have to be handled by the worker.
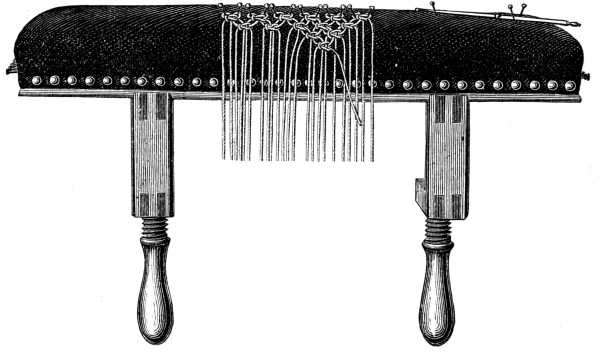
Macramé cushion and other accessories (figs. 513 and 514).—The only really important requisite for macramé work is the cushion, which should be well stuffed, and weighted with lead (fig. 513). It is convenient to have it made to screw on to a table like the Swiss tambour frames. There are other kinds of macramé cushions but none, in our opinion, as practical as these because any pattern can be worked upon them and patterns that have a heading or a border of picots can not be worked on any others. The pegs at the ends of the cushion are for fixing and winding the long threads upon, which carry the knots, and which we shall in future call «cords».
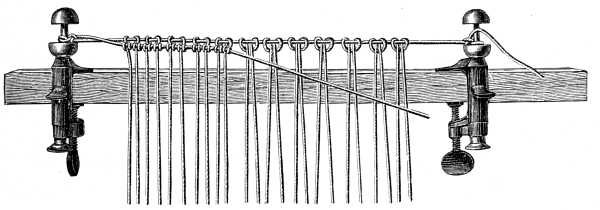
For making long lengths of macramé fringe, metal clamps, with round-headed pegs attached to them top and bottom, to fasten the cords to, as represented in fig. 514, will be found far better than a cushion, as any number of threads can be knotted on to them at a time by pushing them more or less closely together on the cord.
Besides the cushion and clamps, you will require, some big glass-headed pins, made expressly for the purpose, a crochet needle for pulling the threads through the stuff when they have to be knotted on to an edge, and a French mètre or yard measure to measure the threads with; to these implements may further be added, scissors and a metal comb and ruler for cutting and straightening the ends of the threads.
The length of the threads must depend on their substance and size; that is to say, that a knot will take up more of a coarse stiff thread than of a fine pliable one, on which account, to avoid the necessity of preliminary trials, the right length of thread, for the quality and size of material, is given with each pattern. If, for any reason, our workers should not follow the directions given, they must bear in mind that the thicker and stiffer the material, the more they will have to allow for the knots and vice versa.
Formation of the knots.—Beginners must be careful, in macramé as in tatting, not to move or slacken the cord, or horizontal thread that carries the knots. The knots made by the «knotting-thread», as it will be called in future, consist of loops formed over the cord and then tightened. The knotting-thread and the cord are constantly changing places, as you work, loops having to be made now with the one and now with the other.
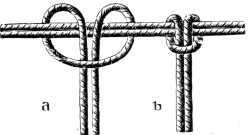
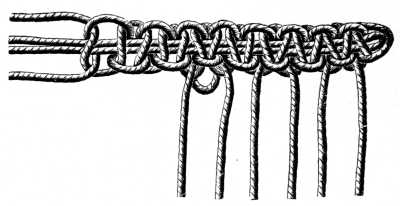
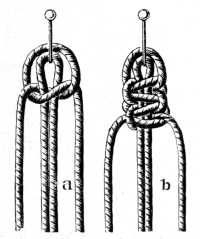
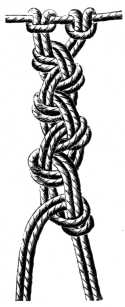
Knotting on the threads (fig. 515).—Excepting when you work with the threads of a material obtained by unravelling and drawing out the cross threads, you must knot on lengths of thread on to a cord; cut them double the length the fringe is to be and fold them in half, so as to form a loop by means of which you attach them to the cord, in the following manner. Put the loop over the cord from the front and bring it back underneath, put the ends down through the loop, detail a, and tighten it, detail b, as shown in the engraving.
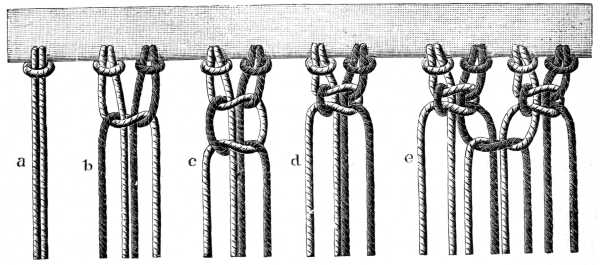
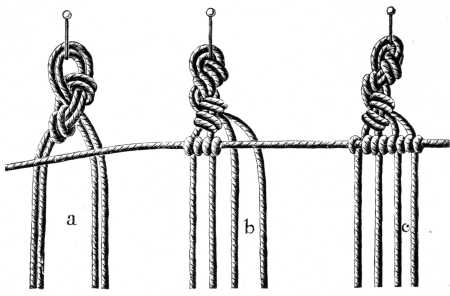
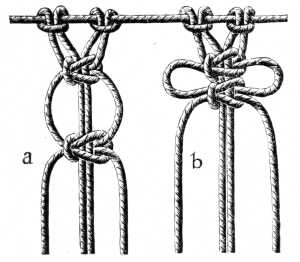
Knotting on the threads on to a stuff edge and formation of a flat double knot (fig. 516).—Push your crochet needle through the edge of the stuff from the right to the wrong side and catch hold of the loop, formed by the folding in half of the thread that is to be knotted on; pull it out to the right side, put the ends through, and tighten the loop, detail a. Detail b shows two double threads, knotted on near to each other in this way, and the first tying together of the two outer threads for the flat knot which is formed as follows: you take the two outer of the four threads hanging down and cross the right hand one under, and the left hand one over the two centre threads. Whilst doing this, hold the inner ones tightly stretched out on the 3rd and 4th fingers of the left hand, detail b. The manner in which the two threads are brought back and tied together again is shown in detail c; the drawing up of the threads completes the so-called flat double knot, detail d. Detail e, of the same figure, shows two flat double knots, side by side, and the first step towards the formation of a third, connecting together the two right threads of the one with the two left threads of the other.
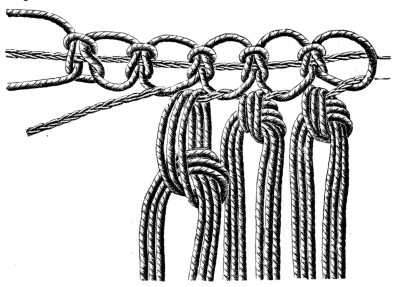
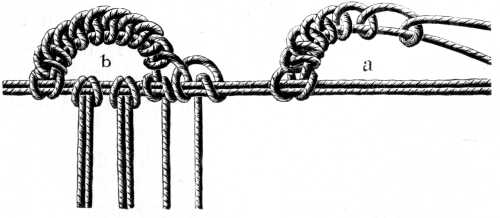
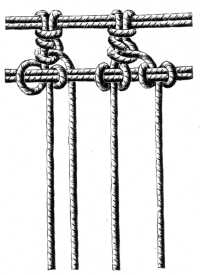
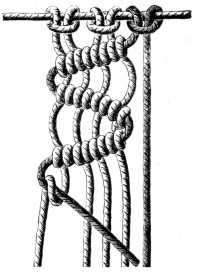
Knotting on threads on to a knotted heading (fig. 517).—Make flat double knots as in fig. 516, detail d, on a double cord and then knot on your threads on to the loops of the double knots, putting the loop through from the right side, so that it may lie at the back. Use double threads so that the work beneath the heading may not be too open.
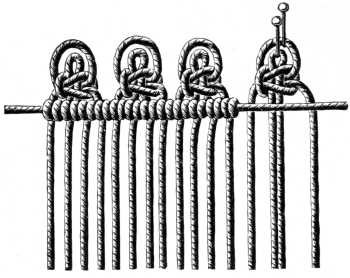
Knotting on threads on to a picot heading (fig. 518) —First, crochet a row of chain stitches, then make flat double knots on the chain, far enough apart for the thread between to form picots on the chain, then a second chain of crochet drawn through the picots on one side, on to which tie triple or quadruple lengths of thread, as shown in the engraving.
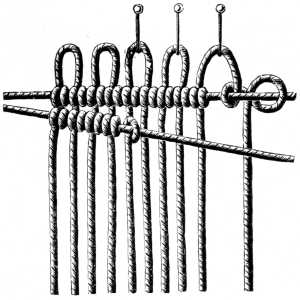
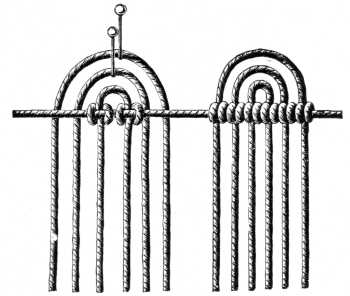
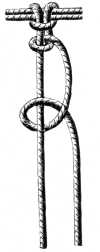
Knotting on threads with round picots (fig. 519).— Fasten the lengths of thread to the cushion with pins, about half a c/m. apart, fix the cord to one of the pegs at the left end of the cushion, hold it tightly extended in a horizontal line with the right hand. With the left hand knot the threads that are pinned down on to the cord, looping each end twice round it, upwards from below and then drawing it through between the two loops or knots thus formed, pulling each knot to the left as you tighten it round the cord. Make the second row of knots in the same way, taking care to lay the second cord as close to the first as possible that the vertical threads may not be visible between. One series of knots forms a bar; there are both horizontal and slanting bars as will be seen later on.
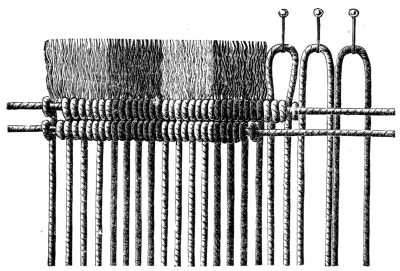
Knotting on threads with a fringe heading (fig. 520).—Knot the threads on with a picot heading, as explained in the preceding figure, then cut the picots through and unravel and comb out the threads.
For this way of knotting on threads, a very strongly twisted material is better than a loose one, as when it is cut and untwisted, it makes a much richer and fuller fringe.
Knotting on with picots and flat double knots (fig. 521). —Take two threads, pin them on close together, make a flat double knot, fig. 516, tying the outer threads over the inner ones, and loop the ends over a cord to make a horizontal bar of knots.
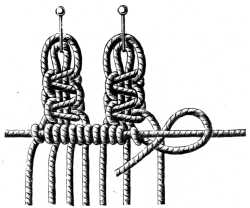
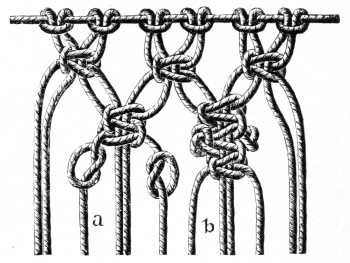
Knotting on threads with picots and two flat double knots (figs. 522 and 523).—Pin the two threads on as before and make two flat double knots, one below the other; detail a shows the first knot begun, detail b the two knots completed. Fig. 523 shows the picots secured by a horizontal bar of knots beneath them.
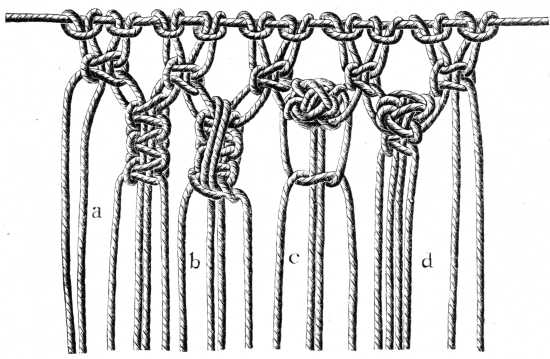
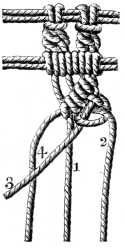
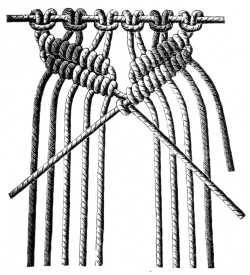
Knotting on threads with scallops (fig. 524).—The threads for the scallops must be cut much longer than those that are to be knotted on below them. The buttonhole loops must be so made that they turn upwards; and there must be 12 of them, all made with the left hand thread over the right hand thread, detail a. Then, knot on two double threads underneath the scallop and besides, make knots with the threads that come from the scallops, detail b.
Knotting on threads with loops (fig. 525).—Pin on two threads folded in half, a little distance apart, detail a, and bind them together with a flat double knot. Pin on more lengths close to them, the inner threads of which are held by a "collecting knot", as the flat double knot is called when it is made over more than two threads (see also fig. 530). The ends of the threads can then be looped over one or two cords, so as to form a single or double bar of knots, as required.
Knotting on threads with triple scallops (fig. 526).—Knot on three single threads in succession; first, the middle one, then the second, with the knot right and left and the loop long enough to form the scallop, then the third in the same manner.
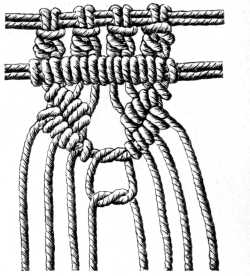
Knotting on threads for ribbed picots (fig. 527).—Take a double thread and make two slanting bars of knots, see details a and b, then secure them, like the preceding scallops by a horizontal bar of knots, see detail c.
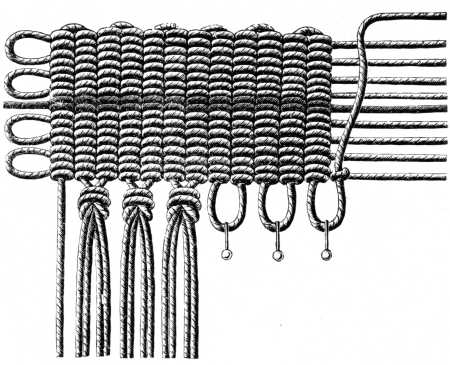
Knotting on threads for a gimp heading (fig. 528).—This mode of knotting on forms a broad gimp, consisting of vertical bars of knots, made over a single cord. On the one side, that which is afterwards turned downwards, the cord, the ribs are made on, forms loops, held with pins, into which meshes of threads can be knotted when the gimp is finished, for making either a fringe or a grounding.
Patterns in several colours may likewise be knotted into gimp headings of this kind.
Flat double knots with half knots (fig. 529).—These are double knots followed by a third knot, or more correctly speaking, a half one of the first flat knots.
Collecting knots (fig. 530).—As explained in fig. 525, these are flat double knots, made over more than two threads. The engraving shows, in the first place on the left, a flat double knot made over two threads, completed, and the first crossing of the thread for the collecting knot; secondly, the second crossing of the threads; thirdly how the collecting knot can, if necessary, be continued over 4 threads, and fourthly, how the collecting knot should be made to finish with a flat double knot.
Plaited and waved knots (fig. 531).—Plaited knots are formed by a continuous repetition of the first crossing of the threads for making a flat knot, detail a; waved knots by a slight twist given to the plaited knots from left to right, detail b. These plaits of waved knots are secured by joining together the threads of opposite meshes, two and two, by a flat double knot.
Single crossed knots and double crossed knots (figs. 532 and 533).—Two plain crossings of the threads, detail a, to begin with; after which you rapidly reverse the threads, turning the knot to the wrong side, drawing it up tightly at the same time; this forms the first knot, detail b. The second knot, fig. 533, is formed by 3 crossings, detail a; reverse the threads rapidly, to form the double crossed knot, detail b. For the following knots tie the threads together, as for the flat double knot, detail c.
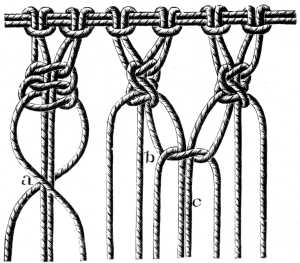
Looped picot and knotted picots (figs. 534 and 535).—Looped picots are made along a row of knots by setting the knots, far enough apart for the loop between, to form a picot when the knots are drawn up close together. In fig. 534, the detail a represents the picot, in its first open stage, detail b the same picot when it is finished.
Knotted picots, fig. 535, are formed after one or more flat double knots, by a knot made in the outer thread; to get this knot into the right place, make it on a big pin and draw it up close to the flat knot before you take out the pin.
These picots are always made on both sides and can be repeated several times along a row of knots. Detail a shows the crossing of the threads for the picots, detail b the picots completed and followed by a flat knot.
Bead knots (fig. 536).—A bead knot is made by turning back the threads after a row of flat double knots. Detail a shows three flat double knots finished, detail b the inner threads turned back over the flat double knots, detail c the two knotting threads, brought between the two threads coming from the left to the right, and detail d the bead knot finished and followed by a flat double knot.
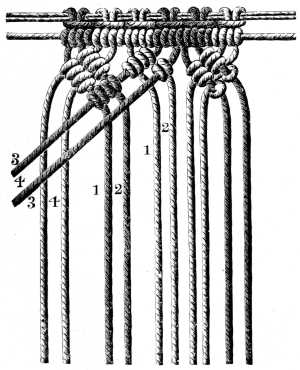
Bars of knots to the right and left (figs. 537, 538, 539, 540, 541, 542, 543, 544).—After knotting on the requisite number of threads on to a double cord, make two buttonhole loops with the right thread round the left one, fig. 537, then knot each thread twice over the second cord, fig. 538. These knots must be as close together as possible. This done, begin to make the slanting bars, inclining from left to right, with 4 threads.
The first thread on the left, marked 1 in fig. 540, serves as cord to the threads 2, 3, 4, which are looped in succession over thread 1.
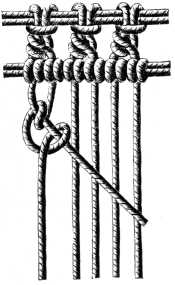 Fig. 539. Bar slanting to the right. The knot open.
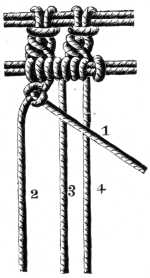 Fig. 540. Bar slanting to the right. Thread 2 knotted over thread 1.
Fig. 541 represents threads 2, 3 and 4, knotted thread 1 and in the second bar, thread 2 becoming in its turn the cord, and having threads 3, 4 and 1 knotted over it, whilst it is being held, tightly stretched in the right hand. The knotting should be done with the left hand.
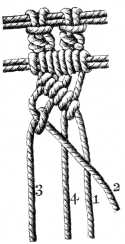 Fig. 541. Bar slanting to the right. Threads 3, 4, 1 to be knotted over thread 2.
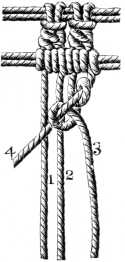 Fig. 542. Bar slanting to the left.
In fig. 542, which represents a bar inclining from right to left, threads 3, 2 and 1 are knotted over thread 4; and in fig. 543, in the second row, threads 2, 1, 4 over thread 3. Here, it has to be the left hand that holds the thread extended from right to left, whilst the right hand does the knotting.
Fig. 544 explains how the double bars are bound together by an ordinary double knot.
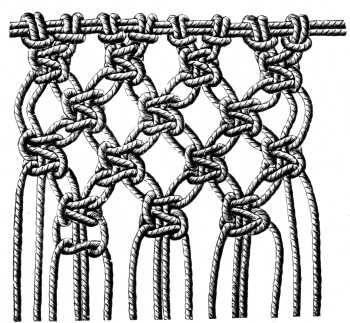
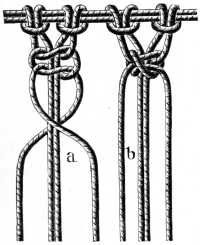
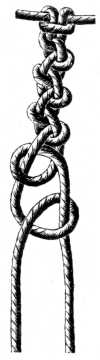
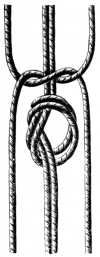
Single chain (fig. 545).—This is made with two single threads, by knotting them alternately over each other, that is, each in turns serving as cord to the other.
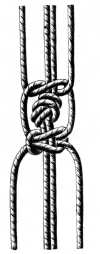
Double chain (fig. 546).—The double chain is made in the same manner as the single, only with a double thread.
Both the double and single chain are generally used in macramé gimps and borders as a means of conducting threads of different colours, from one part of a pattern to another, which could be done in no other way; also, as a continuation to the Chinese knot, fig. 607, as described at the end of this chapter.
Ribbed border (fig. 547).—Here, the same cord runs to and fro; the 4 threads that hang down, form little ribbed bars running right and left. To distinguish from the knotting threads, the thread that runs to and fro it, is represented in a darker colour.
Macramé fringe (figs. 548, 549, 550).—Entire length of the threads for No. 8 of Coton à tricoter D.M.C: 80 c/m.
 Fig. 548. Macramé fringe.
1st row—knot on the threads, as in fig. 515, and in the following order: 1 double white thread, 2 double red, 1 double blue and so on.
2nd row—make a horizontal bar of knots, see figs. 519, 520 and 521, over a second cord.
3rd row—3 buttonhole knots, fig. 524, each with 2 threads.
4th row—like the 2nd.
5th row—make slanting bars of double knots right and left, counting 6 threads for each bar, consequently 12 for 2. The 1st and 12th thread serving as the cords for the knots. In the 2nd series of knots which forms the double slanting bar, make another double knot over the cord with the thread that served as cord in the preceding row.
When the slanting bars are finished, bring them as close together as possible, tighten the last thread on the right and make another double knot with the left thread; the position of all the threads is clearly described in fig. 549. Then continue the bars in the opposite direction, so that the 2nd thread on the left is stretched over the right hand group of threads, and the 11th thread on the right over the left hand group.
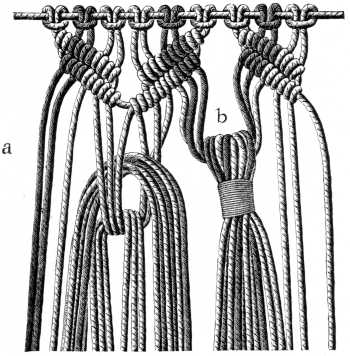
Make 3 rows of double bars and then take always 3 threads of a left hand group and 3 of a right hand one, tie them loosely together in a plain knot, put in, above the knot, a bunch of 8 threads, 15 c/m. long, fig. 550 detail a, draw up the knot close to the bars and wind thread of a different colour several times round it, detail b, to form the tassel.
The other bunches of threads which are hung on between two bars of knots must be tied on the same level with the first, but do not, nevertheless, come into close contact with the bars.
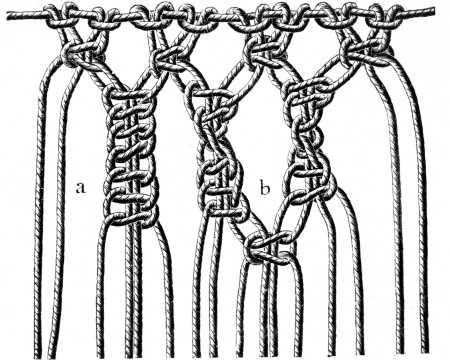
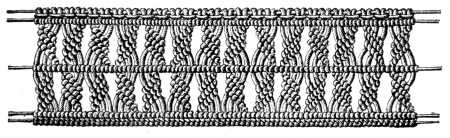
Insertion or fringe (figs. 551 and 552).—Entire length of the threads for No. 8 of Coton à tricoter D.M.C: 50 c/m., including the fringe.
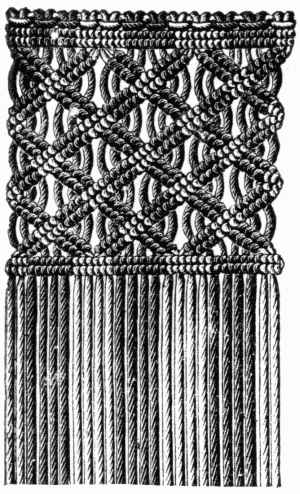 Fig. 551. Insertion or fringe.
1st row—knot on the threads as in fig. 515.
2nd row—1 double horizontal bar of knots, as in figs. 519 or 520, over double cords.
3rd row—Take 8 threads for a group of bars; 2 light and 2 dark ones on each side; the two sets of threads are numbered in fig. 552, a working detail of fig. 551, from 1 to 4.
Begin by making all the knots over threads 1 and 2 of the left set, so that threads 3 and 4 on the left will be outside and threads 1 and 2 inside the group. Make the same knots over the 3rd and 4th thread on the right, then repeat the left group again and so on.
Repeat from the beginning, and make 2 double knots over thread 3 on the right, fig. 552, with threads 1 and 2 on the left, then again 2 knots over thread 4 on the right. When this series of knots is finished, make: 3 double knots over thread 1 (dark-coloured in the engraving) with the left thread 2 and the right threads 1 and 2; make on the left: 3 knots over thread 4 with the right thread 3 and the left threads 2 and 1, and so on.
When this pattern is worked for a gimp and not a fringe, the threads are made to end in knots, as explained in fig. 558.
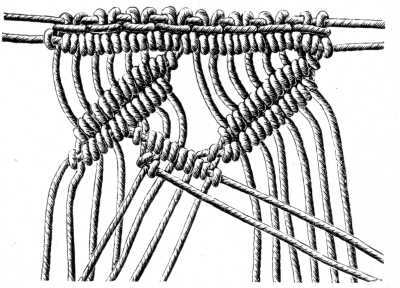
Gimp made with macramé shuttles (figs. 553, 554, 555).—Cut 8 double threads of the length the gimp is to be.
In order not to have to add on threads in the middle of the work, or have long ends hanging down, which are very much in the way, we recommend the employment of a new macramé shuttle, a kind of spool, such as are used in the making of pillow lace. These shuttles simplify the work enormously and are made hollow so that they can be mounted and filled on the spindle of any sewing machine.
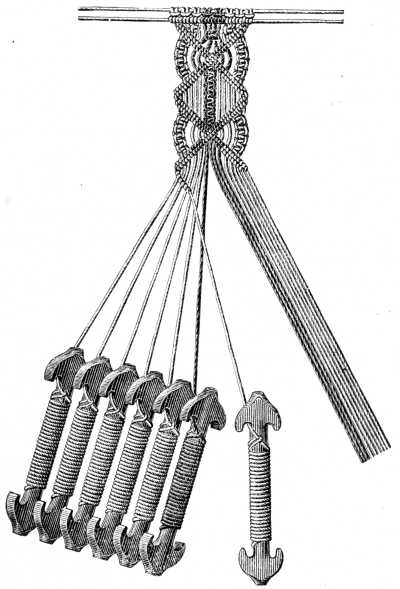 Fig. 553. Gimp made with macramé shuttles.
Knot on the threads, as in fig. 515, and make a single bar of knots. Then leaving 2 threads on the right and 2 on the left disengaged, make 3 flat double knots with every set of 4 threads between. Make a slanting bar of double knots over the 16th right thread, with the 15th, 14th, 13th, 12th, 11th, 10th and 9th thread; then make knots with the same threads and with the 16th over the 15th thread. Make a similar bar on the left, over the 1st thread, with the 2nd, 3rd, 4th, 5th, 6th, 7th and 8th thread.
 Fig. 554.
Macramé shuttle.
Fig. 554.
Macramé shuttle.
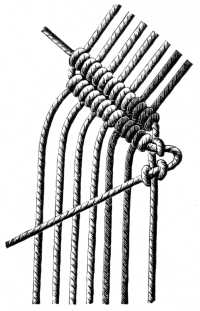 Fig. 555. Slanting bar and
the return of the cord.
Working detail of
fig. 553.
Fig. 555. Slanting bar and
the return of the cord.
Working detail of
fig. 553.
On both sides, and with the 4 outer threads: 4 flat double knots, fig. 516, detail d; 2 more bars on the right and left, but in the opposite direction, and knotting all the threads even to the last one, fig. 555. Take the 4 middle threads and make 6 flat double knots and then turn the bars of knots inwards; the return of the cord is indicated as before in fig. 555.
Macramé borders (figs. 556, 557, 558, 559).—Length of the single threads for No. 6 of Coton à tricoter D.M.C: 50 c/m.
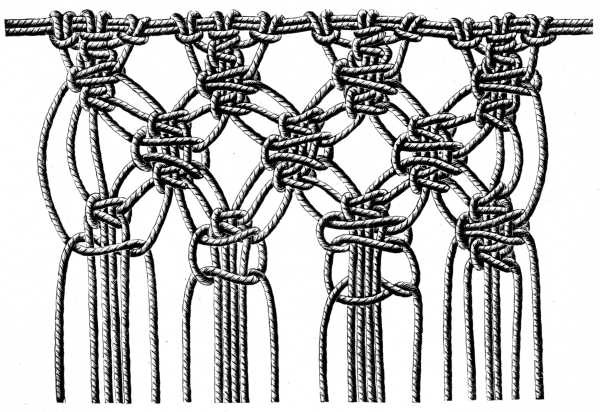
Knot the threads on for both these borders in the ordinary way, followed by a single horizontal bar of knots. For fig. 556, make a triple slanting bar of knots, with 4 threads, slanting one from right to left and one from left to right; then make a single horizontal bar and add another series of triple bars slanting the opposite way; complete the pattern by a vertical bar, lay another cord and make a horizontal bar upon it on the wrong side of the work and finish by tying the threads together, two and two, as shown in fig. 558, detail a, cut them, detail b, and push the knot upwards, detail c.
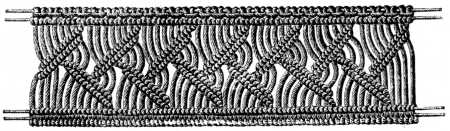 Fig. 557. Macramé border.
For fig. 557 take 8 threads for a group of knots. Make all the bars slanting from right to left first, fig. 559, then take the 5th thread, counting from left to right, for the cord, fig. 559 again, and begin the second series of bars of knots, slanting from left to right. Fasten off the threads as already explained in fig. 558.
The same pattern can also be used as an insertion: bags for instance, look very well made of alternate stripes of this insertion and stripes made of flat knots. The openwork stripes must be wider than the close ones.
Macramé fringe (figs. 560 and 561).—Entire length of the threads, including the fringe, for No. 5 of Cordonnet 6 fils D.M.C: 120 c/m.
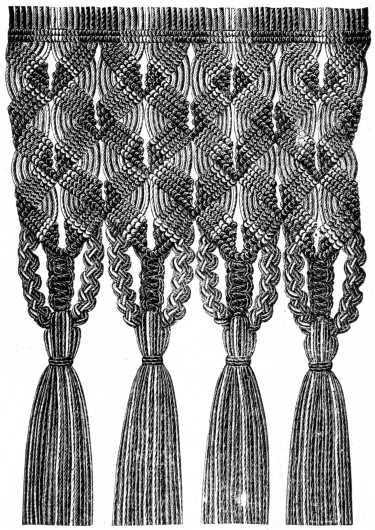 Fig. 560. Macramé fringe.
1st row—knot on the threads, as in fig. 520, in the following order: 4 double blue threads, 3 single dark brown, 1 double light brown, 3 single dark brown; then again 4 double blue, and so on.
2nd row—divide the threads into groups, so that the brown threads come in the middle with 4 blue ones on either side. Begin on the left = cover the 4th blue thread, which comes nearest to the first brown one, with flat double knots, made over the 1st, 2nd and 3rd brown thread and the light brown one = cover the 3rd blue thread with the 4 brown threads and the 4th blue, which served as the cord in the 1st row of knots = cover the 2nd blue thread with the 4 brown and the 4th and 3rd blue = cover the 1st blue with the 4 brown and the 4th, 3rd and 2nd blue.
In the working detail, fig. 561, the dark lines represent the blue threads, the light ones, the brown.
When the quadruple bar, slanting from left to right, is finished, make a similar one, from right to left, then connect the 1st and 16th thread by a double knot and pass the first blue thread on the left over to the right group.
2nd row—make similar groups, reversed, so that the brown knots come next to the last blue ones and the blue knots again terminate the groups of bars; the brown threads will be stretched flat between the preceding group and the next.
3rd and 5th row—like the first.
4th row—like the 2nd.
After the 5th row of groups, take 4 brown threads on either side of the blue knots, and make them into a double chain, fig. 546, consisting of 12 knots, and make 6 flat double knots with the last threads.
Lastly, unite all the threads of one group of bars, and make them into a handsome tassel by the addition of other threads.
Macramé fringe (fig. 562).—Entire length of the threads for No. 3 of Cordonnet 6 fils D.M.C: 75 c/m.
 Fig. 562. Macramé fringe.
1st row—Knot on the threads as in fig. 527, succeeded by a double horizontal bar of knots.
2nd row—twisted or waved knots with 4 knots, fig. 531.
3rd row—double horizontal bar of knots.
4th row—with 6 threads: 1 double bar, slanting from left to right, and 1 bar, from right to left, joined together by the last threads.
5th row—with the 4 threads coming from the groups of bars: 1 single chain, fig. 545, with 4 crossings of the threads, quite close to the point where the groups meet, and 1 single chain with 7 crossings, made with the outside threads.
6th row—similar groups of bars to those of the 4th row, but set the reverse way and terminating in a horizontal bar. For the tassels, add a thick bunch of threads to each group of 6 threads that issues from the work.
Fringe with mosaic border (figs. 563, 564, 565).—Entire length of the threads for No. 8 of Cordonnet 6 fils D.M.C: 75 c/m.
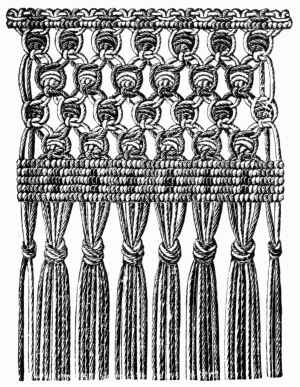 Fig. 563. Fringe with mosaic
border.
Fig. 563. Fringe with mosaic
border.1st row—knot the threads on, as in fig. 515, one écru and one brown alternately, succeeded by a single horizontal bar of double knots.
2nd, 3rd, 4th and 5th row—4 rows of knots, such as are seen in fig. 564, in process of being made, and in fig. 565, finished, and succeeded by a flat knot. The colours alternate in the knots; in the 2nd and 4th row the knot is set in the light colour, in the 3rd and 5th, in the dark.
6th row—1 horizontal bar of double knots over a fresh cord.
7th row—lay down another cord, make another horizontal bar of knots and between every second of the light double knots, loop on 1 red thread; the loop, that fastens it to the cord, taking the place of the knot.
8th row—lay down a third cord, and make 2 double knots with the red threads between the knots of écru thread.
9th row—lay down a fourth cord, make a half knot with every red thread.
10th row—lay down a fifth cord, then make a horizontal bar of double knots, as in the 6th row; the red threads are taken to the wrong side and passed over. Knot the ends of the threads together in clusters of 6, about 15 m/m. below the last cord of knots.
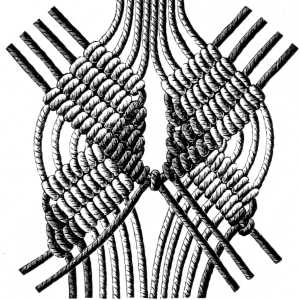
Macramé ground (figs. 566, 567, 568).—Fill the shuttles with the length of thread that you think will be required for the work.
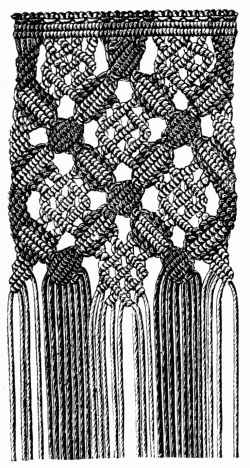 Fig. 566.
Macramé ground.
Fig. 566.
Macramé ground.1st row—knot the threads on, as in fig. 515, 4 blue and 4 écru alternately, and make a double horizontal bar.
2nd row—beginning in the middle, make 2 flat double knots with 8 blue threads; with the 4 blue threads on the left, make a quadruple group of bars over the 4 blue threads on the right. These quadruple groups of bars, called «shell bars» are illustrated in detail in fig. 567. Unite the blue threads at the sides by flat double knots.
The beginning and continuation of the openwork parts of the pattern are explained in fig. 568.
The threads that issue from the last group of knots are used for making the second shell bar, the two inner bars of which are made in écru cotton, and the two outer in blue. When this striped shell bar is finished, the blue threads are again united for the openwork figure.
Fringe with foundation worked on the wrong side (figs. 569, 570, 571, 572).—Entire length of the threads for No. 8 of Coton à tricoter D.M.C: 80 c/m.
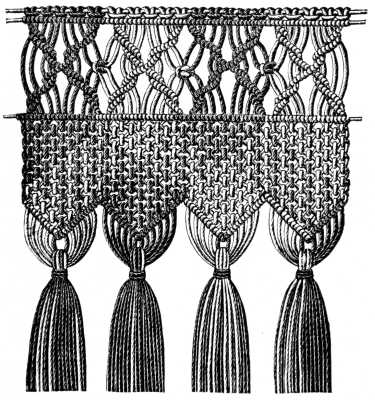 Fig. 569.
Fringe with foundation worked on the
wrong side.
Fig. 569.
Fringe with foundation worked on the
wrong side.Knot the threads on, as in fig. 515 and after finishing the horizontal bar, make from left to right, over the 1st thread, 1 double knot made with the 2nd and with the 3rd thread.
Then, over the 2nd thread, which has now become the 1st, make double knots with the 3rd, 1st, 4th and 5th thread; then, over the 3rd thread, counting now from right to left, which in the knotting on figured as the 4th: 1 double knot with the 5th and 2nd thread.
Make the same group from right to left, only at the 3rd change of thread make 5 double knots instead of 2, and let the last knots count for the new group of bars, turned the opposite way.
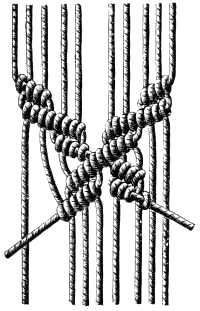 Fig. 570.
Opposing bars.
Fig. 570.
Opposing bars.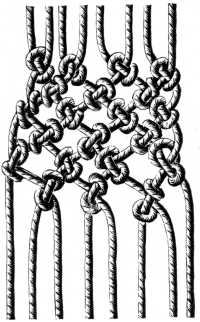 Fig. 571.
Formation of the knots
on the wrong side.
Fig. 571.
Formation of the knots
on the wrong side.In the middle of two opposing groups of bars, make a flat double knot with 2 of the right threads and 2 of the left.
When the second horizontal bar is finished, turn the work round, and go on working on the wrong side, making plain double knots, as in fig. 571, turned in one row, all from right to left, and in the next, from left to right.
When you have worked 10 such rows of knots, begin to make one knot less on either side of a group, so as to form pointed scallops of knots which you finish off with a plain bar.
Tassels are then made with the threads that issue from each scallop, and when these are sewn up, turn the work round to the right side, where the knots, made on the wrong side, will present the appearance indicated in fig. 572.
Macramé fringe (fig. 573).—Entire length of the threads for No. 6 of Coton à tricoter D.M.C: 65 c/m.
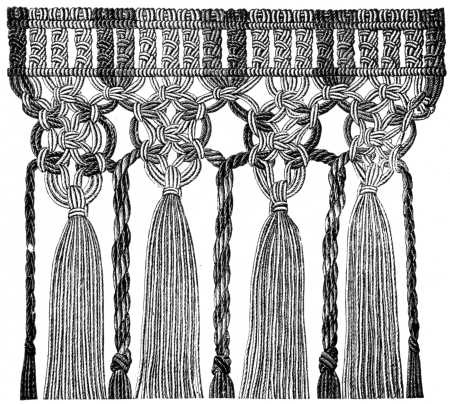 Fig. 573. Macramé fringe.
Knot on double threads, as in figs. 517 and 524, to count as single in the working directions = * 1 thread of red, colour 358, 3 of écru, 1 of red, colour 358, 1 of red, colour 321, 3 of écru, 1 of red, colour 321, and repeat from *.
1st row—6 chain knots made with every 4 threads.
2nd row—a single horizontal bar of knots.
3rd row—collecting knots, fig. 530, made with the écru threads over the 4 dark and the 4 light red ones, and flat double knots over the 4 écru threads.
4th row—collecting knots over 4 écru threads with 4 red and 2 écru threads.
5th row—collecting knots in the centre of the groups, with the écru threads.
6th row—similar to the 4th.
7th row—similar to the 5th.
Then take the red threads on the right and left and twist them, each cluster separately, from left to right between the thumb and forefinger, as you do in making a cord, then unite them together, twisting them from left to right. Fasten off the cord by a knot, beneath which the ends of thread form a little tassel. Collect all the écru threads together and make them into a heavy tassel with the aid of supplementary threads.
Border with shell knots (figs. 574, 575, 576, 577).—Fill the macramé shuttles with the requisite length of thread. Knot the threads on, as in fig. 520, in the following order; 1 double thread of colour 471, 6 double threads of colour 450, 2 of colour 471, 6 of colour 450, 1 of colour 471.
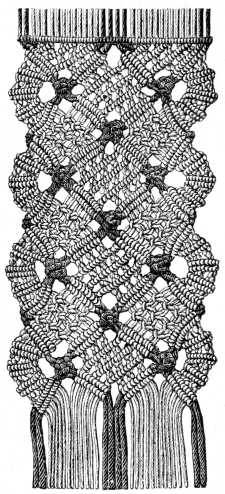 Fig. 574. Border with shell knots.
From left to right and over the 1st thread: 1 double knot with the 2nd thread; over the 4th thread of colour 450, and from right to left, double knots with the 3rd, 2nd and 1st thread of the same colour = from left to right: 1 double knot with the 6th thread of colour 450 over the 5th, and with the 3rd thread over the 2nd = from right to left: 5 double knots over the 8th thread of colour 450 = from left to right: 1 double knot over the 10th thread, 1 double knot over the 5th thread, 1 double knot over the 1st thread = from right to left: 7 double knots over the 12th thread = from left to right: 3 detached double knots.
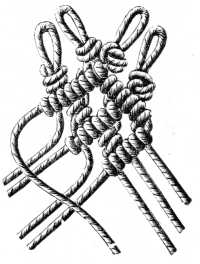
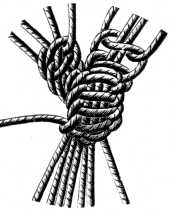
Then, from left to right, and subsequently from right to left = with 6 green threads: 2 double bars slanting over the 2 red threads (see the top of fig. 577); unite the 4 red threads in the middle and make a shell knot with them, fig. 575, consisting of 6 flat knots, fig. 576; take 2 threads on the right and 2 on the left, turn them down to the left and right, and then from the wrong side to the right, over the threads that come from the bars and close with a flat knot. On the sides, make double bars and between each bar, 2 single chain knots.
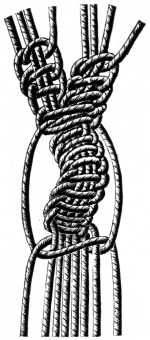
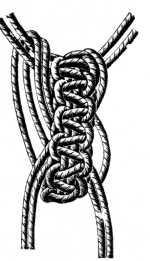 Fig. 575. Large shell
knot, open.
Fig. 575. Large shell
knot, open.
 Fig. 576.
Large shell knot,
shut.
Fig. 576.
Large shell knot,
shut.Fill the empty spaces under the outside shell knots, with 9 flat double knots; under the middle knot make bars of inter-crossed knots, of which a clear explanation will be found in fig. 577.
To join two borders of the kind together, pass the thread of the second border over the thread on which the bar in the middle of the outer scallop is knotted.
Fringe with shell knots (fig. 578).—Entire length of the single threads for No. 12 of Coton à tricoter D.M.C: 90 c/m.
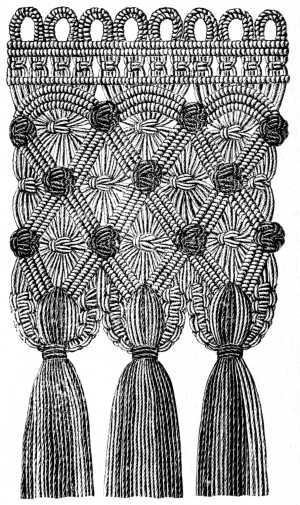 Fig. 578. Fringe with shell knots.
The threads must be taken double, counting as one. Knot them on, as in fig. 524. This exceedingly effective pattern is a very simple one to work and can easily be copied from the engraving by following, for the bars, figs. 537 to 544; for the collecting knots fig. 530, for the large shell knots figs. 575 and 576, and for the chain of flat double knots, fig. 536 detail a.
The tassels that complete the fringe must depend from the last collecting knot and hang between the triple bars of knots and beneath the collecting knot.
Macramé border or fringe (fig. 579).—Entire length of the threads for No. 10 of Cordonnet 6 fils D.M.C: 170 c/m.
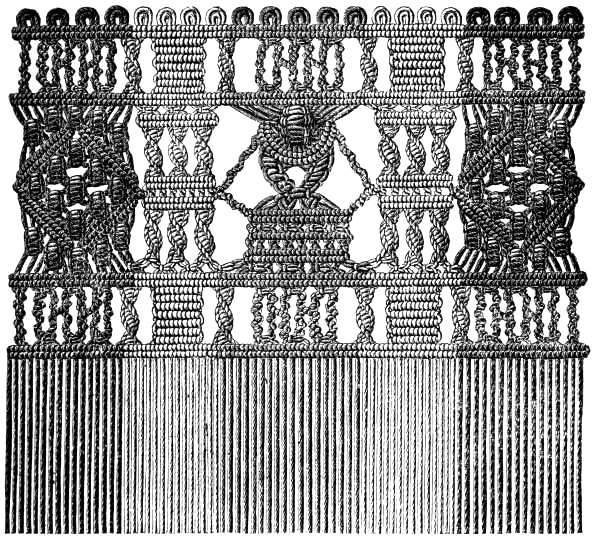 Fig. 579. Macramé border or fringe.
1st row—knot on the threads with double round picots, and one horizontal double bar. The colours should succeed each other as follows: * 4 blue scallops, 4 écru, 5 red, 4 écru, repeat from *.
2nd row—begin working from right to left: 1 single chain with 2 single threads, fig. 545, and 7 changes of the threads; after the 3rd change of the threads, connect the 2nd chain with the 3rd, the 4th with the 5th. Finish off every 2 chains with a flat double knot.
Make, over the first blue threads; 1 waved plait, fig. 531 detail b, = over the 14th écru thread: 1 bar of double knots, 3 going and 4 returning = over the last 2 red threads: waved knots, and repeat from * = then lay down 2 fresh cords, to make a double horizontal bar of knots.
3rd row—with the blue threads: 5 large shell knots, fig. 576, 1 triple bar of double knots to the left and right = between the bars 9 large shell knots = 1 triple bar of double knots to the right and left and finish with 5 large shell knots, as above.
With the écru threads: 3 flat double knots, 1 double horizontal bar of knots = over the last écru thread: 3 waved knots with 12 changes of the threads = 1 more double bar of knots = join the cord to the outside thread of the blue triple bar. With the red threads: 1 shell knot, figs. 576 and 577, over 12 threads; 1 double bar on both sides of the shell knot with the outside threads, 1 single chain, consisting of 7 changes of the threads, made with the outside red threads; join the red thread and the light one that comes from the double bar together, on the left.
The light thread is afterwards looped into the blue thread on the right = 4 collecting knots over 6 red threads on the right and left, 1 collecting knot over all the red threads and one, on both sides, over 6 red threads.
After joining the threads on both sides, carry on the single chain with 3 changes of the threads = over the first red thread of the left chain, make 1 double horizontal bar with all the disengaged threads = below the bar, 4 flat double knots = 1 single horizontal bar = 8 double knots, each over a single thread = 1 double bar of knots.
From this point, continue with the écru threads: 1 row of double knots, 1 double horizontal bar and 1 waved plait; then join: 2 blue threads and 2 écru, and 2 écru and 2 red, together, to make flat double knots; the double knots between remain of one colour.
The bottom border is like the top one with the exception of the picots.
When this pattern is to be used for an insertion or a gimp, the threads should be fastened off, as indicated in fig. 558.
Macramé border (figs. 580, 581, 582).—Wind the threads on shuttles and knot them on, as in fig. 515, in the following order: 2 threads of, either colour 334 or Chiné d'or (blue and gold), 2 of colour 330, 2 of colour 392, 1 of colour 432, 1 of colour 310, 2 of colour 430, 1 of colour 310, 1 of colour 432, 2 of colour 392, 2 of colour 330, 2 of colour 334, or of Chiné d'or blue and gold.
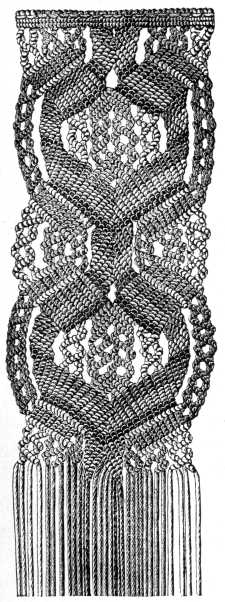 Fig. 580.
Macramé border.
Fig. 580.
Macramé border.Begin with the open work on either side of the crossed bars, figs. 581 and 582, with 4 blue threads and by 4 changes of the threads outwards and 3 inwards = the same with 4 light green threads with 3 changes outwards and 2 inwards = then with the dark green threads, with 2 changes outwards and 3 inwards = over the 4th dark green thread, 1 double knot with the 1st dark green thread with the 4th light green one and with the 4 blue.
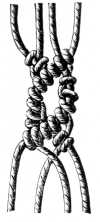 Fig. 581.
Crossed bar
slanting to the
left.
Working detail of
fig. 580.
Fig. 581.
Crossed bar
slanting to the
left.
Working detail of
fig. 580.
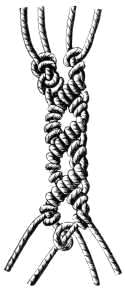 Fig. 582. crossed
bar slanting to
the right.
Working detail of
fig. 580.
Fig. 582. crossed
bar slanting to
the right.
Working detail of
fig. 580.
Over the 3 next, dark green threads, knot the 4 light green threads and the 4 blue, from right to left, and from left to right, thus forming altogether 8 bars across the first bar = then knot the 8 first threads over the last dark green one = add a crossed bar with 7 changes of the threads outwards and 5 inwards.
Middle group, left side: 1 double knot with the first light brown thread over the second thread; 3 double knots with the black threads (the only ones that are to be taken double) and 2 light brown threads over the 1st and 2nd dark brown ones.
In the 2nd bar, knot the 1st dark brown thread, and in the 3rd, the 4 dark brown ones, over the black thread. On the right, a similar group, slanting towards the one on the left.
On the left—over the 1st light brown thread coming from the right, 1 double knot, made with 2 light and 2 dark brown threads, and the black one, all coming from the left.
On the right—over the 1st light brown thread coming from the left, 1 double knot with 1 light and 2 dark brown threads and the black one (used double).
On the left—over the light brown thread coming from the right, 1 double knot with one light and 2 dark brown threads and the black one.
On the right—over the light brown thread, 1 double knot with 2 dark brown threads and the black one.
On the left—the same knots as on the right.
On the right—over the 1 dark brown thread 1 knot with 1 brown thread and the black one.
On the left—the same knots as on the right.
On the right—over the 1st dark brown thread, 1 knot with a brown thread and the black one.
On the left—the same knots over the last thread.
On the right—over the last brown thread one knot with the black one.
On the left—over the 4 light green threads and the 4 blue ones, double knots with the 4 brown threads and the black one = 1 double knot with the 1st light brown thread over the 2nd, 3 double knots over the 2nd dark brown thread, with 2 light threads and 1 dark brown = 4 double knots with the 2 light and the 2 dark brown threads over the black one; after which you make 5 other bars, taking the last thread turned inwards for the cord. Make similar groups, slanting from right to left, then, beginning again on the left, make the knots with the 4 light green threads over the 1st thread of the same colour running from right to left.
On the right—knot 3 light green threads over the 1st thread coming from the left and repeat the same group twice, on both sides.
The third bar forms, at the same time, the first scallop of a triple crossed bar, which has also to be made on the right.
The two crossed bars finish with a triple group of bars; the last bar of which, on the right, consists of only one double knot.
There remain to be made, on both sides, crossed bars with three whole scallops inside, one outside, and one half one, top and bottom.
Knot all the other threads over the 4 blue and the 4 light green ones = in the middle, knot the right and the left threads, alternately, till the black threads meet at the point.
Turn the group of bars, edged with blue and light green, inwards, and finish it off by a crossed bar, with 3 scallops inside.
Macramé fringe (figs. 583 and 584).—Entire length of the threads for No. 15 of Cordonnet 6 fils D.M.C: 120 c/m.
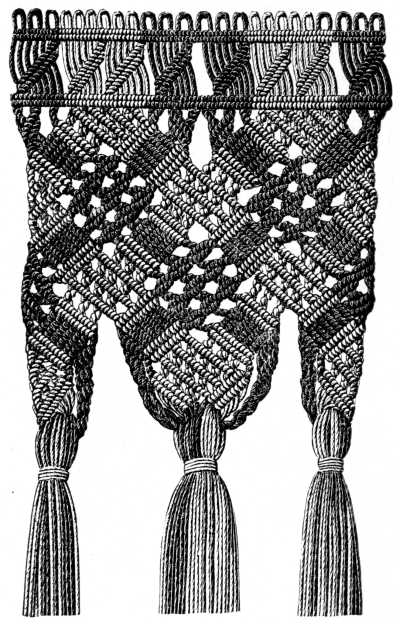 Fig. 583. Macramé fringe.
1st row—knot the threads on with picots, fig. 519, 6 écru and 6 brown.
2nd row—double and slanting bars made with 6 single threads, succeeded by a double horizontal bar.
3rd row—begin with the light threads and make bars with double knots between, as in fig. 577, and finish at the sides with 2 bars made with the brown threads; for the dark brown bars, see also figs. 555, 561, 568, for the crossed bars, fig. 584.
This pattern should always end in such a manner that the light openwork figure form the scallop and be framed with the brown knot.
Macramé fringe (fig. 585).—Entire length of the threads for No. 12 of Coton à tricoter D.M.C: 96 c/m.
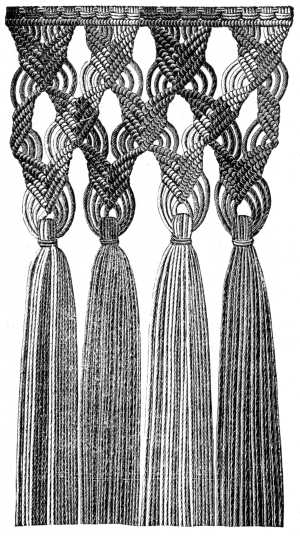 Fig. 585. Macramé fringe.
This pattern is so easy that we refer our readers to figs. 544 and 561 for the working of it, merely remarking, that the bars are made alternately from right to left, and from left to right, and that 3 threads are knotted over the cord that runs from the left and 4, over the one from the right.
This fringe will always be found most effective in appearance if it be made in four shades of one colour, knotted on in succession.
Macramé fringe or ground (figs. 586 and 587).—Entire length of the threads for No. 8 of Cordonnet 6 fils D.M.C: 150 c/m.
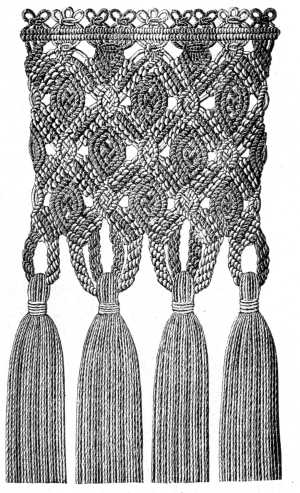 Fig. 586. Macramé fringe.
This effective pattern is not difficult, save in appearance, so that it is unnecessary to describe it in detail; for the knotting on, see fig. 525; for the plain bars, figs. 539 to 544; for the collecting knots, fig. 530. The only difficult point is where the threads cross each other inside the bars and form a check and by carefully following the course of the knots in fig. 587, that will be easily overcome.
Fringe or ground with picots (fig. 588).—Wind the threads on shuttles and do the knotting on, as in fig. 521, followed by a double horizontal bar.
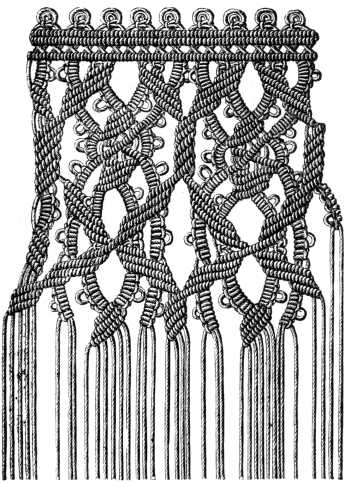 Fig. 588. Fringe or ground with picots.
Leave a small space between the double bar and the 3rd bar, which is a single one, in which you cross the threads without knotting them.
Beginning on the left—over the 2nd and 3rd thread: 2 buttonhole knots, 1 picot, 2 button hole knots = over the 1st, 2nd and 3rd thread: 1 double knot with each of the 3 next threads = over the 6th and 7th with the 5th thread: 4 buttonhole knots with 1 picot after the 2nd knot.
With each of the 4 next threads, that is the 8th, 9th, 10th and 11th: 1 flat double knot followed by: 1 bar of double knots over the 12th thread as the cord, made with the 11th, 10th and 9th thread = add 1 bar with the 11th thread as the cord, and the 7 next ones as the knotting threads = add 1 bar with the 10th thread as the cord, and the 7 next ones as the knotting threads. Leave 3 threads free on the right = with the 8 threads on the left: 1 bar over the thread before these 3 threads = leave 3 free again on the right = 1 quintuple bar with the remaining threads.
* 1 flat double knot with the 15th, 16th and 17th thread = with the 20th thread, over the 19th, 18th and 17th thread: 4 buttonhole knots with 1 picot after 2 knots = knot 4 threads over the 13th thread and from left to right = from left to right, 2 bars with all the threads **.
Over the 2 threads on the left and with the 3rd thread: 4 buttonhole knots and 1 picot = with the 6 threads from the left: 2 bars consisting of buttonhole knots and picots = a 3rd bar with 6 double knots = join it to the last bar.
Leave 2 threads of the bar of buttonhole knots free = with the outer thread make: 4 buttonhole knots and 1 picot over the 2nd thread and the cord of the bar.
Repeat from * to ** along the bar, also from right to left.
Left group—knot the 3 last threads over the 4th thread and from left to right.
Right group—make, from right to left, 1 bar consisting of 6 double knots, over the 4th thread counting from right to left. After these last changes of the threads no difficulty will be found in copying the rest of the pattern.
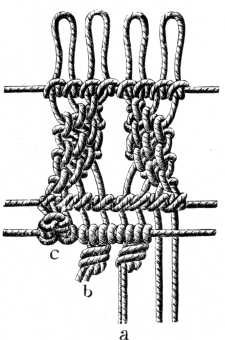
Double fringe (figs. 589, 590, 591, 592).—Entire length of the threads for No. 10 of Cordonnet 6 fils D.M.C: 100 c/m., and entire length for No. 16 of Coton à broder D.M.C: 40 c/m. Knot on, as in fig. 515, 1 thread of Cordonnet, 4 of Coton à broder (these are to be taken double) 2 of Cordonnet, 4 of Coton à broder, and so on.
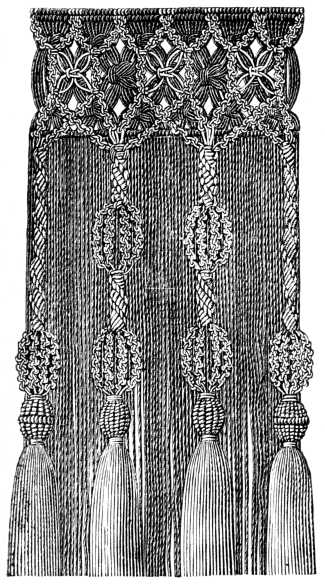 Fig. 589. Double fringe.
In the second horizontal bar, you only use the red threads of Coton à broder for knotting, not the white Cordonnet ones. To supply their place, knot on two threads of red Coton à broder under the white threads.
With the red threads (4 count as one) make 3 rows of collecting knots, followed by a single horizontal bar. Divide the white threads into twos and make single chains with them, the whole length of the fringe; the thread must be changed 8 times for each chain; then pass the right chain under the left one and join them by a flat double knot.
You then, with the threads turned outwards, right and left, make the single chain with 5 changes of the threads and join them together again by a flat knot.
The other single chains are made with 6 and 8 changes of the threads and crossed under the double knots. The tassels, which the red threads serve as a foundation to, are begun by: 1 waved plait with two knots, then 4 single chains, again a waved plait and 1 berry composed of knots.
This berry is made over the 8 threads that come from the chains, with a long auxiliary thread, knotted as shown in fig. 590.
Large shell knots, as described in figs. 591 and 592 may be substituted in the place of the berry, fig. 590.
Macramé border (fig. 593).—Fill 24 shuttles, knotted together, that is, 2 and 2, and knot on 3 green threads, 6 gold and 3 green. The changing of the threads and the course of the knots can be so easily copied from the pattern that a description in detail is not necessary, it is sufficient to observe that all the dark parts in the engraving should be worked in green and the light ones in gold.
 Fig. 593. Macramé border.
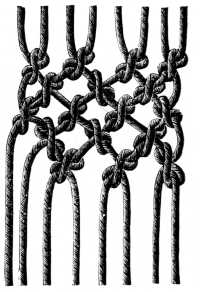
Beaded ground (fig. 594).—Knot on 4 threads for every group of knots, and secure them by a knot and a picot, as shown in the engraving. Work the groups of knots, as indicated in fig. 568, and after each group is finished, thread a gold bead on to every 2 threads. Our model is worked in écru thread and gold beads; the latter go very well with any colour and especially with the more subdued shades of green, such as the Vert-Mousse, Vert Bouteille and Gris-Tilleul of the D.M.C colour card.
 Fig. 594. Beaded ground.
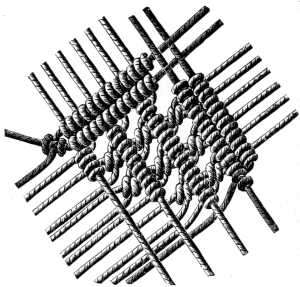
Square of mosaic macramé (figs. 595 and 596).—This little pattern illustrates the way in which tapestry and cross-stitch patterns can be utilised for macramé.
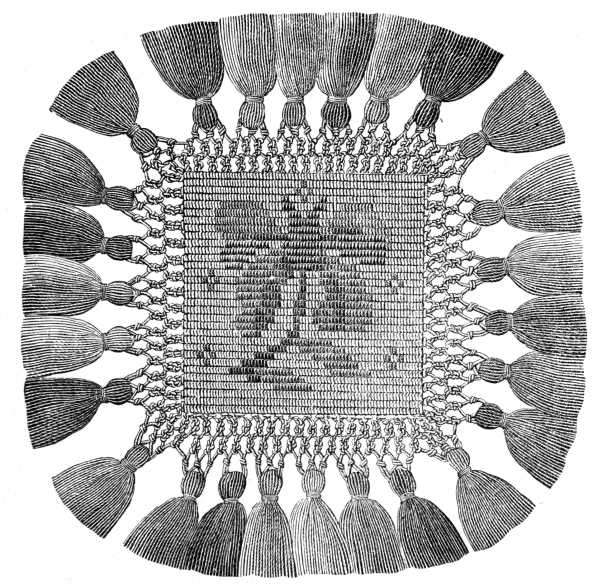 Fig. 595. Square of mosaic macramé.
All patterns that are drawn on checked paper can be copied in macramé and even in several colours. For every square, you count either one single or one double thread, according to the scale on which the work is to be.
In the case of a single thread, you count one double knot per square, in that of a double one, 4 double knots, two in the first and two in the second row.
After knotting the threads together, two and two, and pinning them to the cushion, see letter a, make 2 single chains with 2 changes of the thread, letters b and c, then take a very long cord, letter d, and knot on the threads. The cord forms picots along two sides of the square; into which you fasten threads, letters e and f, for the single chain formed, on the two other sides by the knotting threads.
The coloured threads for the flowers are knotted on as the pattern requires it, taking the place for the time being, of those with which the foundation is made, which are left hanging on the wrong side until they are wanted again.
The top leaves of the iris shaped flower, are worked in two shades of blue; the bottom ones, in three shades of red, the stalk and the leaves in green, and the little stars, with which the ground is powdered, in real gold thread.
When the ground is finished, you make the same openwork border at the sides and along the bottom, as at the top and finish off with very full tassels, hung on over 3 double threads and made of all the colours used in the square, tied up with gold thread, fig. 596 letter g.
Fringe with three rows of tassels (fig. 597).—As this kind of fringe is chiefly used for trimming carpets, curtains and furniture, it is best to make it in the coarsest numbers of the materials indicated at the foot of the engraving.
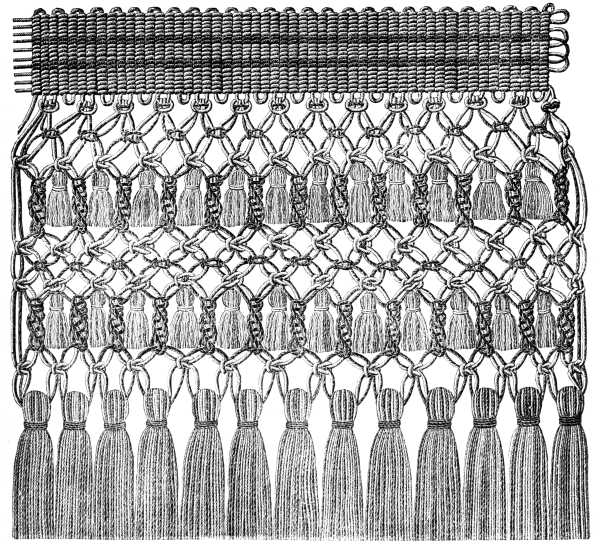 Fig. 597. Fringe with three rows of tassels.
The pattern is so simple in its construction that it is sufficient to refer our readers to fig. 528, for the knotting on of the threads and to fig. 531, for the waved plait.
The little tassels between the knots, are made separately from the rest of the work and fastened on by the thread with which you sew them together at the top.
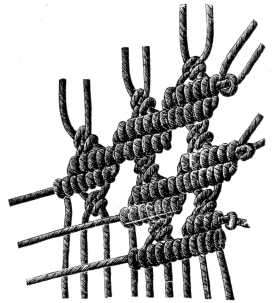
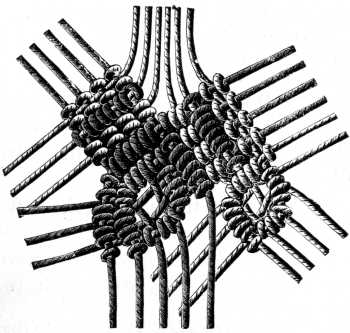
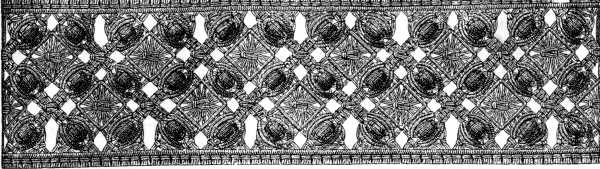
Macramé ground (fig. 598).—The work represented in the engraving was made for a purse and copied from a beautiful piece of Arabian stuff. Ganse turque D.M.C was used for the light background and Coton à broder D.M.C for the design. It is very easy to copy this pattern from the illustration by paying scrupulous attention to the number of knots; we do not therefore enter into any detailed description of the same, merely referring the worker to figs. 528 and 596 and the accompanying directions, for the adding on and the taking off of threads.
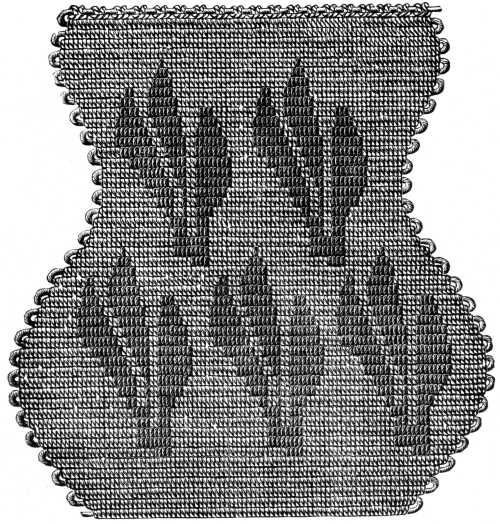 Fig. 598. Macramé ground.
Macramé square (figs. 599 and 600).—Length of the single threads of both kinds: 200 c/m.
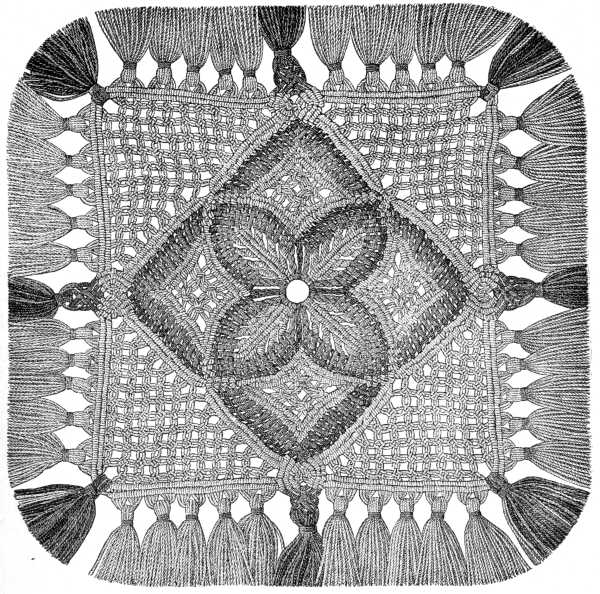 Fig. 599. Macramé square.
Knot upon a ring consisting of one thread: * 1 thread of white Cordonnet, 1 of Coton à broder colour 309, 1 of colour 358, 1 of colour 309 and repeat three times from *. (The embroidery cotton is to be taken double.)
Begin with the light red thread and make: 1 single chain with 3 changes of the threads, 1 single chain with the dark red thread with 4 changes of the threads. Add, or rather thread, 8 supplementary threads in succession on to the white thread, which in fig. 600, comes in the middle of the group of knots, and over each of these supplementary threads, make 2 double knots with the light red thread and 2 with the dark.
When all the red threads are knotted over the white ones, make crossed bars with the red threads by themselves, thus producing a point at the bottom of the leaf.
Then, over the first white thread coming from the right, knot all the white threads on the left of it and in the last place, the cord itself, over the 3 red threads.
Make the same series of threads on the left. This is succeeded by a second bar of white knots, the last thread of which is left unknotted. Make 4 double knots with the 8 white threads and close the square by a double bar. Add a supplementary thread to the first bar, so that you may have 10 threads coming from each side of the second bar and over these you knot the red threads, which form a dark setting to the leaves.
When this is done on both sides, make 10 flat double knots with a supplementary knot, taking 4 single threads for each knot, and decreasing the number of knots successively to 2. At the point of the inside square, knot the white threads over the red ones and turn back the second white thread to serve as a cord to the first of the outside bars. Join the first thread on the left and the first on the right, to form a flat knot with them in the middle, the threads of which are then passed over the red threads; the last white threads become the cords for the second outer bar. Make a group of bars with the red threads and cross them 3 times, then finish with a handsome tassel and join the white threads together all round the square with tassels. In the case of your wishing to use these squares for making a larger piece of work, through joining several of them together, you can knot the ends of the threads into short double chains, finishing off these again with ring knots, fig. 608, and loops; through these loops, when you come to join on the next square, the knotting thread is drawn, forming them thus into connecting picots, like those which you make in tatting.
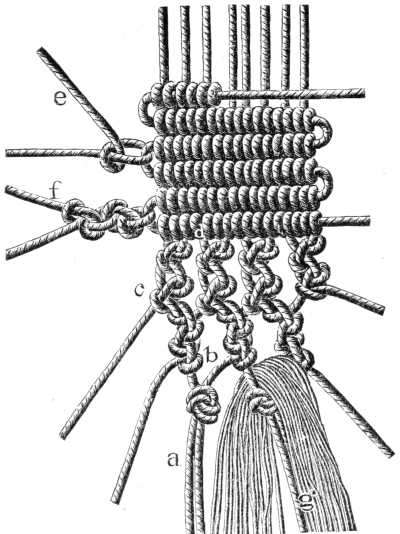
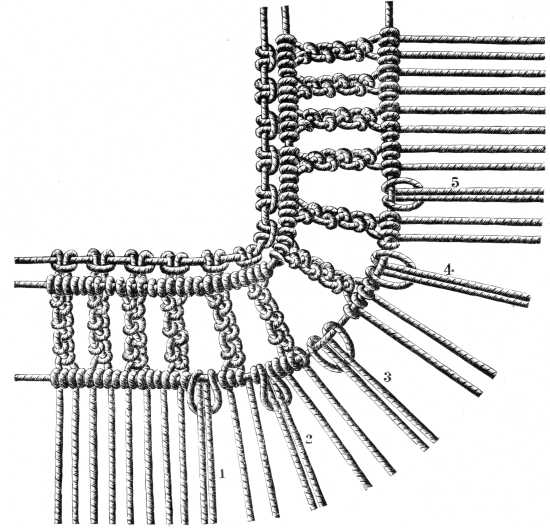
Fringe with corner (figs. 601, 602, 603).—Macramé fringes are not capable of being drawn up, as knitted, crochet, and netted fringes are, on the inside, so as to turn the corners. Consequently, according to the pattern, a greater or less number of supplementary threads have to be knotted in so as to form the corners.
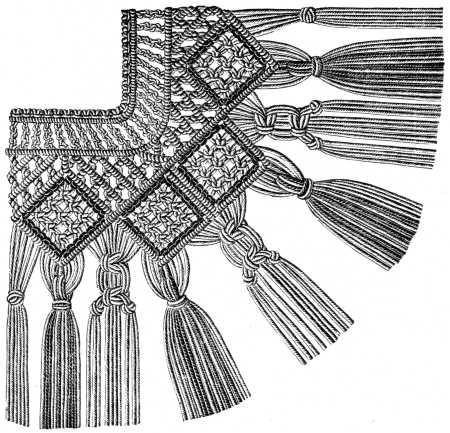 Fig. 601. Fringe with corner.
The working detail, fig. 602, shows us how the 5 first supplementary threads, are looped on to the 4th row of knots. A group of crossed bars requires 16 threads, which answer to 4 groups of little squares, placed between the lozenges. The 6th supplementary thread is put into the double connecting knot at the corner, fig. 603, and on this, the bar of knots which runs right and left is subsequently made. (In order to make it clearer, the supplementary threads are represented in the engraving in a darker shade).
On the two middle threads, which are a continuation of the connecting knot, 7 supplementary threads have next to be knotted, thread 7 singly, threads 8 and 9 together, threads 10, 11, 12 and 13, all singly.
In this manner the supplementary threads 7, 10, 11, 12 and 13 connect the two cords, whilst threads 8 and 9 only, are mounted separately on both sides.
The bars, formed by the knots which are made with the supplementary threads, must be drawn tight, like any other double bar. The space left between the cords in the engraving is intentional, to distinguish the supplementary threads from the others.
A long, coloured thread is looped on to the topmost thread, between the two bars, and with this, knots are made over all the 14 threads that come from the bars and run inwards.
In the middle of the square there must be 9 flat double knots; when these are made, you continue knotting the red thread from the right and left, down to the bottom point of the square, and complete the figure by a single bar of knots, made of the white thread.
Knotted tassels, hanging from the points of the scallops, and others ornamented with flat double knots made of 10 threads, suspended between the scallops, form the outside finish to this fringe.
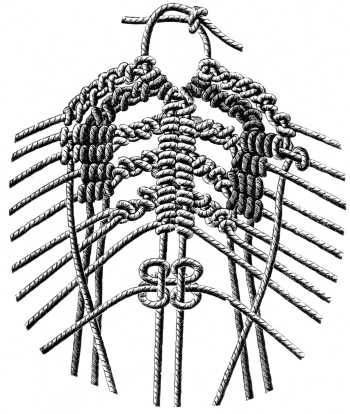
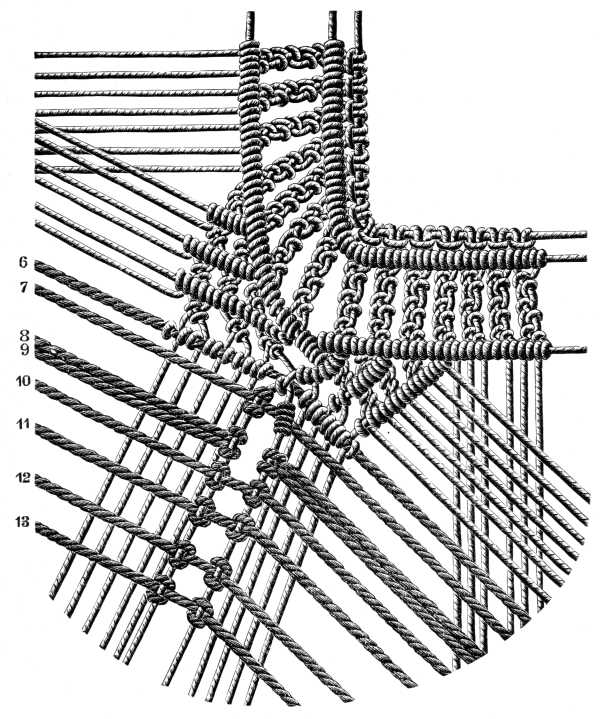
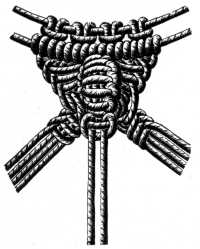
Fringe with pointed scallops and large tassels (figs. 604, 605, 606, 607, 608, 609, 610).—Entire length of the threads for No. 15 of Cordonnet 6 fils D.M.C: 200 c/m.
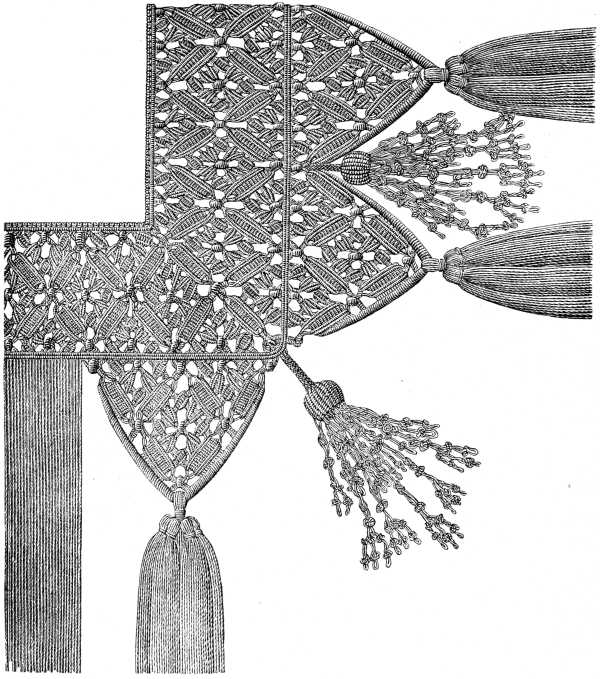 Fig. 604. Fringe with pointed scallops and large tassels.
The present pattern, which concludes our chapter on macramé work, is one of the most difficult of all, requiring great accuracy in every particular, but more especially, extremely careful attention to the direction of the cords, that the groups of double knots and the bars may be drawn up very tightly together, so as to make the pattern very distinct and give each figure its proper value.
For each repetition of the subject 16 threads are wanted. You begin the half stars, on each side of the lozenges, with the 15th and 16th double thread of the first figure and make 3 double knots with 3 threads over a 4th thread, fig. 606.
Over 2 cords on the left and 2 on the right, consequently over 4 threads: 5 buttonhole knots, with the 4 threads and the disengaged threads, 1 flat double knot over each of the 4 threads. This forms a shell knot, on either side of which, make 3 buttonhole knots over 3 threads.
For the groups of bars on either side of the shell, take the 11th, 12th, 13th and 14th double thread on the left, and the 3rd, 4th, 5th and 6th on the right. These groups are joined by buttonhole knots.
Knot the 4 threads of the left group over the cord on the right; and over them again the 2 next threads on the right; knot the 4 threads on the left over the 4th thread on the right; make 2 buttonhole knots with the 4th thread over the 3 threads at the bottom and on the side.
Over the 4 threads, that come from the left and right, make quadruple bars; cross the upper threads after the second row of bars, make 2 buttonhole bars with the next thread over the 4th thread, then finish the 3rd and 4th bar of knots.
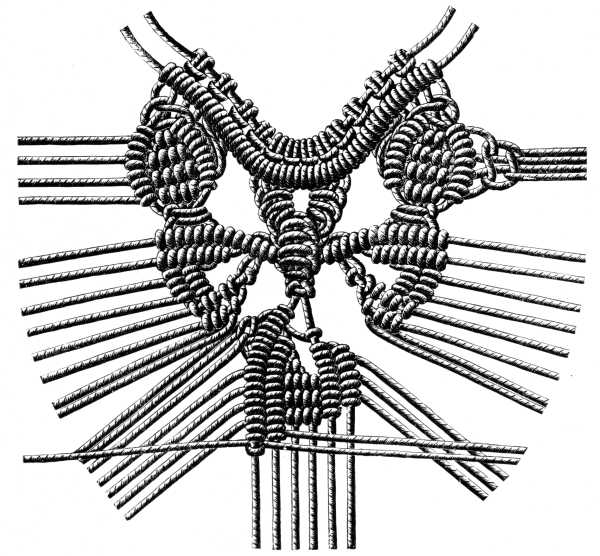
To make the olive-shaped group of knots on both sides, take the threads, that come out from the shells, as cords. Fig. 605 shows the adding on of the first supplementary thread, fig. 606, that of 12 more which, knotted on to the first, form with it, the group of bars on the diagonal corner line. The knots, of which the next large shell is composed, are made with 2 more supplementary threads and one thread from the preceding figure. Add on 2 more supplementary threads to the disengaged threads, which 4 then serve as cords for the groups of bars, left and right.
The 4th group of bars which forms the corner of the fringe, is made on the 4 threads that come from the large shell, on to which the fourth set of 12 supplementary threads is knotted.
The pattern ends at the bottom with a half star, and a double bar; beneath these, large scallops are added, consisting of 2 half stars, 4 ovals, 1 whole star and 2 ovals.
All the threads that come from the groups are then collected at the top of the scallops and overcast with strong thread, so as to form a thick round cord along the edges of the scallops, widening towards the point, as more and more threads are taken in. At the point, these threads are knotted into a big tassel with another bunch of supplementary threads added to them. The other small tassels, represented in fig. 604, are made separately and then fastened on.
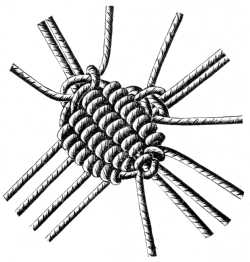
The fringe is further ornamented by large knotted tassels, introduced between the scallops, for which, a large knotted berry, fig. 590, over 21 cords, has first to be made.
Collect the 21 threads all together, to begin with; then make: 2 rows of knots over 12 threads, 1 over 15, 3 over 21, 1 over 15 and 2 over 12; then cut the ends of the 21 threads to the same length, and turn them inwards, to fill up the hollow space inside the berry, stuffing it besides, if necessary, with wadding to make it perfectly firm and hard and sewing it together at the ends.
To this you attach 5 large and 6 small pendants; the smaller ones are begun with a Chinese knot, figs. 607 and 609, which terminates in a double chain, formed into a ring knot.
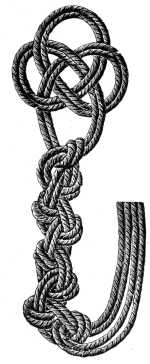 Fig. 607. Chinese knot and double chain for a ring knot.
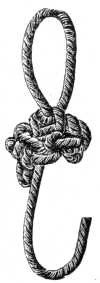 Fig. 608. Ring knot formed of a single chain.
These ring knots take the place, in macramé, of bead drops, in gimp trimmings; when they are made of a double chain, you cut away 3 threads, when of a single, 1 thread, conceal the ends carefully inside the knot, make a loop with the 4th or 2nd thread, fig. 608, and lastly, fasten off all the ends with two or three invisible stitches.
Into the loop formed by the 4th thread, you hang 3 small ring knots, made of a single chain, with a loop, top and bottom, formed of the ends of the thread.
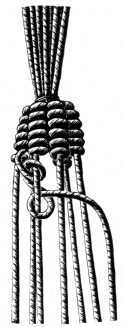
Fig. 609 represents the small pendant, of which six are required for a tassel; fig. 610, the large one, of which there should be five. The berry, or head of the tassel, is attached to a crochet, or knotted cord, of which a description will be found in the last chapter but one of this work.
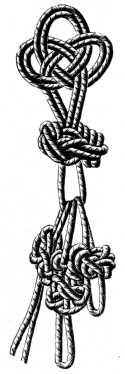 Fig. 609. Small pendant of the tassels in fig. 604.
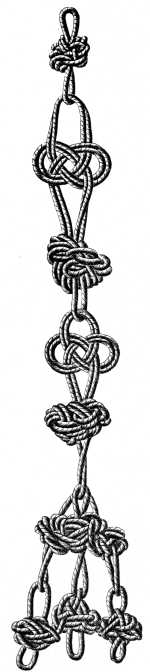 Fig. 610. Large pendant of the tassels in fig. 604.