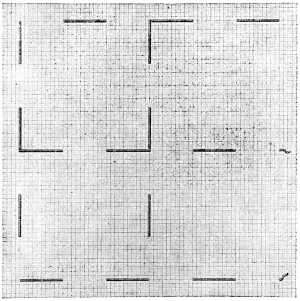
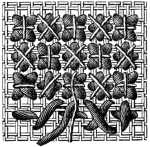
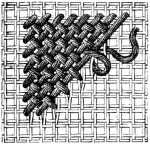
 Insertion in cross stitch, alike on both sides, the pattern left blank.
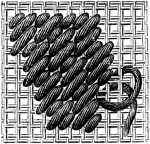
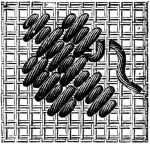
Insertion in cross stitch, alike on both sides, the pattern left blank.
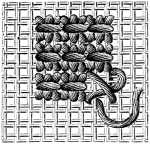
Insertion in cross stitch, alike on both sides, the pattern left blank.
Tapestry is one of the oldest kinds of needlework and one which has always been popular every where.
There are two distinct sorts of canvas in use for tapestry, called respectively, 'plain (single thread) canvas', and 'Penelope (double thread) canvas'. The latter is generally preferred, because it is easier to count the stitches upon it, but both make an equally good foundation for the embroidery, as the following examples will show.
Besides canvas, other fabrics bearing a close resemblance to it, are often used, especially Java linen, the close texture of which renders grounding unnecessary.
Cloth, velvet or plush can also be overlaid with canvas, the threads of which are pulled away after the pattern is finished. For work of this kind, we however prefer a material with less dressing, such as a twisted tammy, or Colbert linen, because the pulling out of the harsh rough threads of the canvas is very apt to injure the material beneath.
Stitches, worked upon two stuffs, must be drawn very tight, or they will look loose and untidy when the auxiliary fabric is taken away.
Tapestry can be done either in a frame, or in the hand; in the latter case, the ends of the piece of canvas should be weighted with stones or lead, to prevent its puckering.
The stitches, which ought completely to hide the canvas, should all lean one way and the underneath ones always from left to right, as the letters in writing.
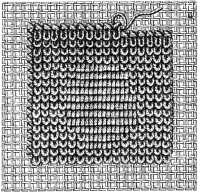
Marking out the embroidery ground (fig. 252).—Before beginning a piece of canvas work and tacking on the auxiliary fabric, count how many stitches it will contain, and mark them out in tens, with a coloured thread, as shown in fig. 252, along two sides at least, in the length and breadth. Having ascertained the number of stitches both ways, divide them in two, and starting each time from the middle stitch, trace two lines, one horizontal, the other vertical, right across the canvas. The point of intersection will be the centre. This sort of ground-plan will be found most useful, and should not be pulled out until, at least, half the work be finished. If moreover, you have corners to work, or a pattern to reverse, in the angle of a piece of embroidery, trace a diagonal line besides, from the corner to the centre.
Materials suitable for tapestry.—Hitherto, wool and silk, were the materials chiefly used for canvas work; a very thick wool for carpets, as being warmer and more durable. Silk is too delicate a fibre to resist much wear and tear, and cannot therefore be recommended for articles that are intended for constant use, and wool, though stronger, is subject to the destructive agency of moths; whereas cotton, which is cheaper than both, and quite as brilliant, is free from all these disadvantages and is extremely easy to clean.
For most kinds of tapestry we can therefore with perfect confidence, recommend the use of Coton à tricoter D.M.C Nos. 6 to 20, Cordonnet 6 fils D.M.C Nos. 3 to 15, and even Coton à repriser D.M.C No. 25.[A]
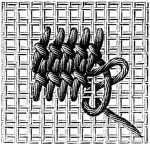
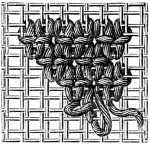
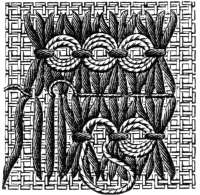
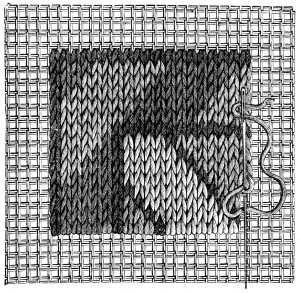
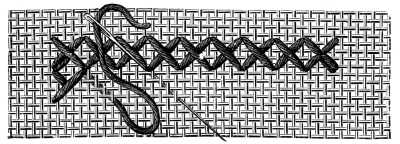
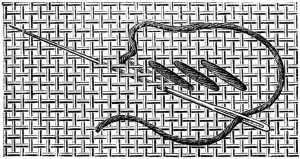
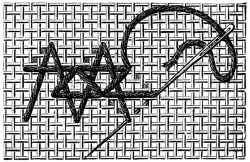
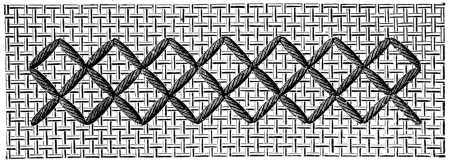
Cross stitch (fig. 253).—Cross stitch is the foundation of every other stitch, and the one in most common use. It is also called marking-stitch, being used for marking linen. It is worked in two lines. In the first, the thread is carried diagonally from left to right across a square of threads, and then, downwards, underneath the two horizontal threads; in the second, the stitches are carried from the right-hand lower corner of the square to the upper left-hand corner, so that the four points of the two stitches form a perfect square.
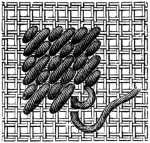
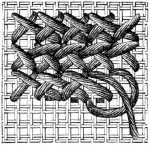
Half cross stitch (fig. 254).—If the cotton is too coarse, or the canvas too fine, to make the double stitch, carry the thread back along the whole line and make the half-stitches across it, from left to right; the same in the case of a piece of work, which you buy with
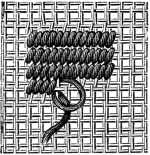
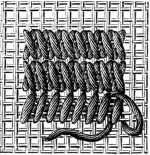
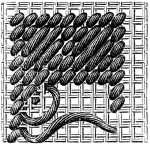
Gobelin stitch on plain canvas (fig. 255).—This is worked over two horizontal threads and one perpendicular. In a frame, you can work the second row, from right to left, otherwise, you must turn the work round, and bring out your needle behind the last-made stitch.
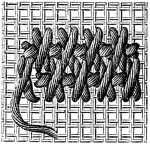
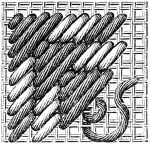
Gobelin stitch on Penelope canvas (fig. 256).—For the same stitch on Penelope canvas, you need rather a coarse needle, which will make its way easily between the threads of the canvas.
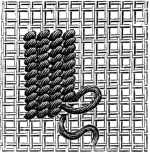
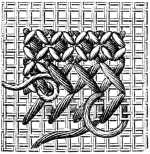
Reps stitch (fig. 257).—Contrary to Gobelin stitch, this stitch which is an imitation of reps, is worked in vertical lines, over two vertical threads and one horizontal one.
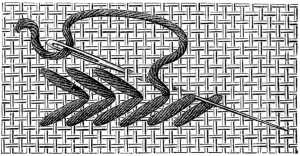
Tent stitch (fig. 258).—This stitch is simply the first half of a cross or marking stitch, worked over a single thread each way. The illustration shows the working of a row, from right to left, the thread being carried forward, underneath the vertical threads. Tent stitch is used for the most part, in conjunction with cross stitch, for the more delicate lines and the shaded parts of flowers and figures.
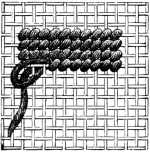
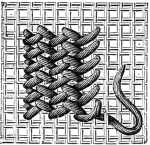
Wide Gobelin stitch (fig. 259).—This stitch covers two vertical and two horizontal threads, and advances one thread at a time.
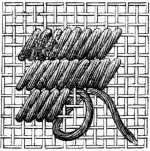
Broad cross stitch (fig. 260).—Worked over two vertical and four horizontal threads, and very useful for filling in large surfaces as it can be done twice as quickly as the ordinary cross stitch. It may be varied by turning the crosses first one way and then the other.
Double stitch (fig. 261).—Begin with a simple cross stitch over every alternate intersection of the threads then make a second row of stitches between those of the first, but in this case, over two and six threads, so that they extend beyond the first each way. In the subsequent rows, a square stitch should be opposed to a long one and a long stitch to a square one.
Rice stitch (fig. 262).—Fill in the whole ground first, with large cross stitches, over four threads each way, then upon these, make the so-called rice stitches. These cross the four points of the large cross stitches, and meet in the space between, where they form another cross. The large cross stitches should be worked in rather coarse cotton, the rice stitches in one of a finer quality.
Double stitch, set two ways (fig. 263).—This consists of diagonal and upright cross stitches, alternately. Work from left to right, and carry the thread over four vertical threads and downwards, under two horizontal ones, then diagonally upwards, over four threads and downwards under two, then again over four vertical threads, and so on. Coming back, you cross the first threads, and pass the working thread each time in a straight line, underneath the two threads of the canvas. The stitches of the third and fourth rows are set, as the illustration shows, the opposite way to those of the two first, the thread being laid the contrary way. Gold thread is generally used for this second set of stitches; Or fin D.M.C pour la broderie, or Chiné d'or D.M.C will be found to be the most suitable for the purpose.[A]
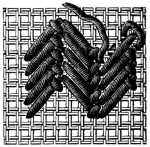
Plait stitch (fig. 264).—It requires great attention to work this stitch, to and fro; the easier way is to carry the thread back each time, to the starting point.
Carry the thread from left to right, over two horizontal threads, and downwards under four perpendicular ones, then under two threads, from right to left, as the figure indicates.
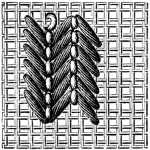
Stem stitch (fig. 265).—Here, the stitches are worked in separate rows, over four threads each way. The working thread passes first under the two middle threads, from right to left, and then under the two upper ones.
Leaf stitch (fig. 266).—Carry the thread diagonally over two double threads each way, and back under one double thread, to the row whence the stitch started. Make rows of back-stitches in a different colour between the rows of long ones.
Fish-bone stitch (fig. 267).—The difference between this and the preceding stitch is, that the working thread after passing over three perpendicular and three horizontal threads, is secured by a back-stitch over the last intersection of the canvas threads. These back-stitches lean to the right or left, according to the direction of the long stitches.
Diagonal web stitch (fig. 268).—Stretch diagonal threads across the whole surface you are going to embroider, and secure them with rows of overcasting stitches, set, if you are working on Penelope canvas, between the double threads of the canvas. In the next rows the stitches must be set the opposite way, which produces the effect of diagonal or twilled cloth.
Cashmere stitch (fig. 269).—To imitate this texture in needlework first make one stitch over one crossing of the canvas threads, and then two stitches over two crossings.
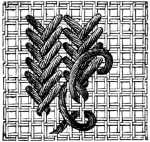
Florentine stitch (fig. 270).—Florentine stitch is worked in slanting lines, the thread being carried, diagonally first over one and then over two double threads of the canvas.
Mosaic stitch (fig. 271).—The first row consists of one short and one long stitch, alternately; the second, of short stitches only, set between the long stitches of the first row; the third row is a repetition of the first, and so on.
Knotted stitch (fig. 272).—Carry the working thread over two threads in width and six in height, bring the needle back, four threads lower down, in front of the double threads, and insert it behind the preceding stitch, and over the middle threads, and then carry it down to the line of the stitches. In the subsequent rows, the stitches extend over four threads and encroach on two of the previous row, so that the stitches of the second row lie between those of the first.
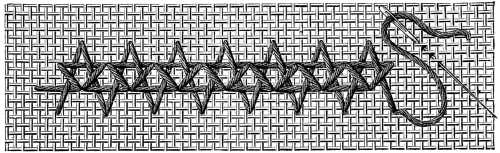
Star, or Smyrna stitch (fig. 273).—- Make a plain cross stitch over four threads, each way, and then over that, another cross stitch, standing upright. The same stitch can be made over six or seven threads; if you work over more than four threads, it follows that you increase the number of stitches accordingly.
Rococo stitch (figs. 274, 275, 276).—After fastening in your thread, lay it over four single or two double threads, as the case may be, and carry the needle through to the left, under one double thread; then, as fig. 274 shows, bring it back over the first stitch, put it in by the side of it, and bring it out below, under half the horizontal threads covered by the first stitch. Then make a stitch to the right, similar to the one just made to the left.
When you have finished one stitch, carry the needle under one thread, in an oblique line, to the next stitch, see fig. 273. The whole pattern is worked in diagonal lines.
Parisian stitch (fig. 277).—This stitch, though it is generally worked on silk canvas, can also be worked on the different cotton and linen materials already referred to more than once in this Encyclopedia. It makes a very good grounding in cases where the material is not intended to be completely hidden. It consists of a long stitch over three threads, and a short stitch over one thread, alternately.
Greek stitch (fig. 278).—This differs from the ordinary cross stitch, in the oblique inclination given to the threads, and the manner in which it is begun. Instead of taking up the two threads that follow the first stitch, you bring your needle back from right to left, under the vertical threads of the first stitch, carry it downwards, and then from right to left, to a distance of four threads beyond the first stitch. The next stitch is made like the first. The rows may be joined together, either by the short or the long stitches, but you must follow one rule throughout. This stitch is much used in Slavonic countries, for the adornment of linen garments, and there we have observed that the short stitches are generally made to encounter the long ones. A coarse material that covers the ground well, such as, Coton à tricoter D.M.C Nos. 6 to 12, is the best one to use for this stitch.
Scotch stitch (fig. 279).—Squares, composed of slanting stitches, made over one, three, five, three threads respectively, and then again over one thread, and separated from each other by rows of Gobelin stitches, constitute what is ordinarily known by the name of Scotch stitch.
Moorish stitch (fig. 280).—For this stitch, instead of surrounding squares of stitches, made in the way we have just described, with Gobelin stitch, the squares are made to touch, rising like steps one above the other, and bordered only at the sides by Gobelin stitch.
Oriental stitch (fig. 281).—Here, you make four diagonal stitches over one, two, three and four double threads respectively; which four stitches form so many triangles, one above the other. The empty spaces between are filled up with Gobelin stitches covering two threads.
Shell stitch (fig. 282).—Carry your thread upwards over six horizontal threads, then from right to left, under one vertical thread and downwards over six horizontal ones. When you have made four vertical stitches in this way, bring the needle out behind the third double thread, counted lengthways, and between the third and fourth, counted across, and fasten the four long stitches together with a back-stitch, to the middle thread of the canvas. Draw a thread of a different colour twice through these back-stitches, so as to form small knots like shells, and then fill in the ground between the rows of long stitches, with back-stitches.
Jacquard stitch (fig. 283).—If you have a large plain surface to cover, you should choose a stitch that forms a pattern in itself. Jacquard stitch and others which we shall describe later on, will be found to produce the effect of brocaded stuff. To work Jacquard stitch, make six stitches underneath one another, over two double threads, and six by the side of one another, from left to right, over two double threads. The second row consists of the same number of stitches, similarly worked downwards and to the side, but over one double thread only.
Byzantine stitch (fig. 284).—Here, you make the same number of stitches as in the preceding figure but with this difference, that the two rows of stitches are made either over two, or four threads.
Milanese stitch (fig. 285).—In the first row, the back-stitch is made alternately, first over four diagonal crosses and then over one; in the second row, over three and two; in the third, over two and three, in the fourth, over one and four. The last long stitches should come under the last short ones and the short ones, in the middle of the last long ones.
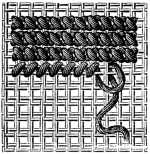
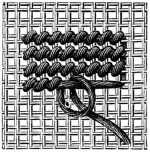
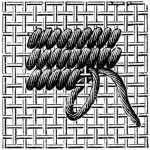
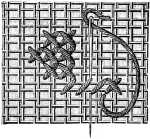
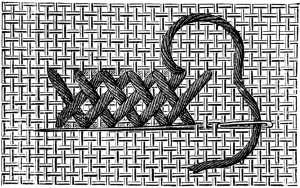
Plush stitch (fig. 286).—This stitch, also called Astrachan stitch, by means of which a very good imitation of an Oriental rug can be produced, consists of loops, each secured by a cross stitch; the best way to ensure these loops being even and regular is to make them over a narrow wooden ruler, or a piece of whalebone.
The effect can be varied by cutting the loops, which gives the surface the appearance of velvet.
The illustration represents the middle loops only, as cut, for the cut and the uncut stitch can both be introduced into the same piece of embroidery. For example, the borders in figs. 290, and 291, are worked in open or cut plush stitch, whilst in the centres, the stitch is left uncut. Two stitches of a similar kind, called Smyrna and Malta stitch, suitable for making rugs or carpets, are described in the last chapter but one in the book.
Chain stitch (fig. 287).—Generally speaking, this stitch is only used for the adornment of under-linen or small articles of fancy-work but it can also be employed in copying cross stitch patterns. In old collections we often meet with very interesting pieces of needlework, which were used for hangings or screens, where the figure-subjects, are executed in chain stitch. Patterns in many colours, gain immensely by being worked in this stitch, the colours blend together better than in any other, and even the shape of the stitch contributes to soften the contrasts of colour.
Chain stitch cannot, like other stitches, be worked to and fro, nor can all the stitches of one row be finished first, as is generally possible in cross stitch work, each row must be begun separately, and always from the same side, and a different needle should be used for each colour, as the material has often to be changed.
The stitch is worked as follows; after fastening in your thread, insert the needle at the same hole it came out of, and bring it out two threads lower down. Keep the loop, formed by the working thread, under the point of the needle. The thread should not be drawn up tightly but left to form a rather loose, round loop. For the next stitches, insert the needle close to the thread that issues from the last loop.
Pattern for borders or grounding (fig. 288).—This simple but most effective design, copied from one of the most beautiful of Oriental carpets, can be executed in, either cross stitch, plush stitch, or chain stitch. To make a wider border still, the diagonal lines that divide the figures shaped like an S, have only to be prolonged, and the figures repeated.
The colours have been chosen with the view of reproducing as nearly as possible the subdued and faded tones, which time has imparted to the original.
 Fig. 288. Pattern for borders or groundings.
 ) Rouge-Cardinal 346,
(
) Rouge-Cardinal 346,
( ) Rouge-Cornouille 449, (
 ) Bleu-Indigo 311, and (
 ) Bleu-Indigo 322,
(
) Bleu-Indigo 322,
( ) Gris-Cendre 414, (
 ) Bronze doré 585 and (
 ) Vert-Mousse 470.[A]
Pattern for grounding (fig. 289).—Diagonal lines, intersected by balls, serve here as a setting for quaintly shaped flowers and leaves. The outlines are all worked in cross stitch, and the solid parts, in either tent stitch or Gobelin stitch.
 Fig. 289. Pattern for grounding.
 ) Noir grand Teint 310, () Jaune
d'Ocre 676, (
) Noir grand Teint 310, () Jaune
d'Ocre 676, ( ) Violet-Mauve 315, (
 ) Rouge-Géranium 349, (
 ) Rouge-Aurore 360,
() Bleu-Indigo 312, () Bleu pâle 668, () Rouge-Cornouille 449, () Vert-de-gris 474,
() Vert-de-gris 475, () Grounding.[A]
) Rouge-Aurore 360,
() Bleu-Indigo 312, () Bleu pâle 668, () Rouge-Cornouille 449, () Vert-de-gris 474,
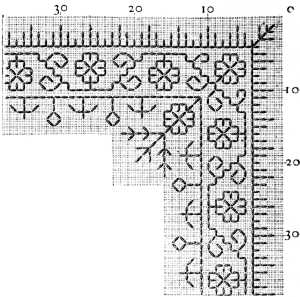
() Vert-de-gris 475, () Grounding.[A]Part of a design, suitable for carpets (figs. 290 and 291). Our space will not admit of our reproducing more than a quarter of this design. Colours of the softest shades should be selected for it. A black line divides the pattern into four quarters. The upper quarter on the right, and the lower one, on the left, should be worked in blue, and the upper one on the left, copied from fig. 290.
 Fig. 290. Part of a design suitable for carpets.) Noir grand Teint 310,
() Rouge-Grenat 358, () Rouge-Cornouille 450,
() Bleu-Indigo 311, () Bleu-Indigo 322,
() Vert métallique 465, () Gris-Noisette 424.[A]
Fig. 290. Part of a design suitable for carpets.) Noir grand Teint 310,
() Rouge-Grenat 358, () Rouge-Cornouille 450,
() Bleu-Indigo 311, () Bleu-Indigo 322,
() Vert métallique 465, () Gris-Noisette 424.[A]The narrow border, in red, blue and green, is to be repeated after the broad band, which is represented in fig. 291, has been added to the grounding. A very good effect is obtained, if in the broad border, fig. 291, you vary the background of the different subjects.
 Fig. 291. Outer border of the design for carpets fig. 290.) Noir grand Teint 310,
() Rouge-Grenat 358, () Bleu-Indigo 311,
() Vert métallique 465, () Jaune-vieil-Or
679, () Gris-Noisette 424, () Rouge-Cornouille 450.[A]
Fig. 291. Outer border of the design for carpets fig. 290.) Noir grand Teint 310,
() Rouge-Grenat 358, () Bleu-Indigo 311,
() Vert métallique 465, () Jaune-vieil-Or
679, () Gris-Noisette 424, () Rouge-Cornouille 450.[A]
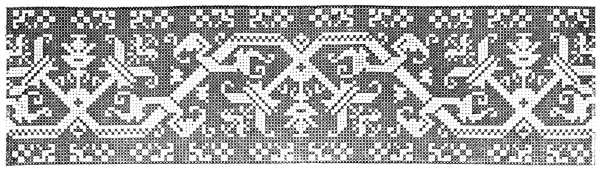
Linen embroidery.—The stitches used in linen embroidery are very similar to those used in canvas work. The ordinary cross stitch, as represented in fig. 253, is the one most commonly used, but it is not so effective as the two-sided stitches, which in the beautiful old needlework of the 15th, 16th and 17th centuries, have always excited our wonder and admiration.
Stuffs suitable for linen embroidery.—Most embroidery of this kind, and more especially the Italian, is done on very fine linen. Such fine work however, requires more time and patience than people, in these days, are as a rule disposed to bestow on work intended merely for pleasure and recreation. To meet the requirements of the day, therefore, in addition to the finer kinds of linen, a great variety of textures, are now manufactured, the threads of which, being thick and round, can be easily counted. The cross stitches that are worked on Cuba, Ceylon or Batavia linen, are large and coarse, those on linen-canvas, Russian linen, twisted tammy, and Rhodes linen, small and fine.
Linen fabrics are either white, unbleached or cream-coloured. All three are used for embroidery, but the coloured cottons show up best on the cream ground; on the white, they look hard and crude, and on the unbleached, dull and faded.
Materials suitable for linen embroidery—As most linen embroidery is executed on articles that are subjected to frequent washing, the D.M.C cottons, which are to be had in every shade and colour, are the best for the purpose. For coarse stuffs, coarse cotton should be used, such as knitting cotton, Coton à tricoter D.M.C Nos. 6, 8, 10, 12 and 14,[A] which will be found a very good substitute for wool; or six-cord crochet cotton (Cordonnet 6 fils D.M.C) Nos. 3, 4, 5, 10 and 15,[A] which gives quite as full and brilliant a stitch, as silk-twist. Finer cottons should be used for the finer stuffs, such as embroidery cotton (Coton à broder D.M.C) Nos. 6 to 200,[A] and lace thread (Fil à dentelle D.M.C) Nos. 30 to 150.[A] In many cases, even darning cotton (Coton à repriser D.M.C) can be used, as like Algerian silk, it can be split or taken double, to suit the stuff.
Plain cross stitch on auxiliary canvas (fig. 292).—Plain cross stitch, commonly called marking stitch, has already been described in fig. 253. But it may be well to observe, that when an auxiliary material is used, it should be most carefully tacked upon the stuff following the thread of the same, and a sufficient margin left to allow of the drawing out of the canvas threads, when the work is finished.
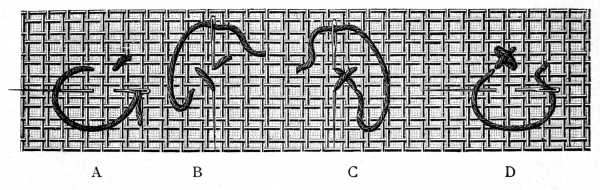
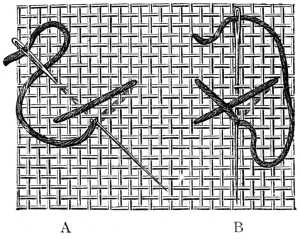
Two-sided cross stitch, worked in four rows of stitches (figs. 293, 294, 295).—Straight lines of cross stitch, alike on both sides, can be worked in two journeys to and fro. Working from left to right, begin by fastening in your thread, never with a knot, but by two or three little running stitches, which are hidden afterwards by your first cross stitch. Directing your needle to the right, pass it diagonally over a double cross of the warp and woof of the canvas, and so on to the end of the line.
Having reached the last stitch, draw out your thread in the middle of it, make an auxiliary diagonal stitch downwards to the right, bring the needle up in the middle of the last stitch, take it thence, upwards to the left, across two threads, and begin the return journey, from right to left, crossing and thus completing the first row of stitches. In the auxiliary stitch with which you begin the backward journey, the thread lies double on both sides. Fig. 295 shows how to pass down to the next row.
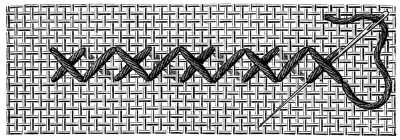 Fig. 294.
One journey and first half of the second finished,
and auxiliary stitch leading to the second return.
Fig. 294.
One journey and first half of the second finished,
and auxiliary stitch leading to the second return.
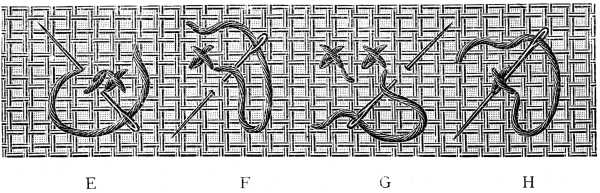
Two-sided marking stitch (figs. 296 and 297). The above mode of working two-sided cross stitch cannot be applied to letters, or patterns in broken lines, which both consist chiefly of isolated stitches. Figs. 296 and 297 explain the course of the stitches in embroidery of this kind.
The working detail A, Fig. 296, indicates the spot for the thread to enter the stuff, and the position of the needle for the first and second stitches; B, the first two stitches completed, with an auxiliary stitch to the right, the thread drawn out on the right, and the position of the needle for the fifth stitch that completes the cross; G shows the completion of the stitch begun at B and the position of the needle for a second stitch to the right; D, one cross stitch completed and another begun, immediately beneath A. In fig. 297, E shows how to work stitches to the left; F, an auxiliary stitch to reach an isolated cross stitch on the right, G, auxiliary stitches between two isolated cross stitches, and H, a second and last auxiliary stitch to complete the cross.
It requires both practice and care to do this two-sided marking stitch, so as not to disfigure the stuff by superfluous stitches.
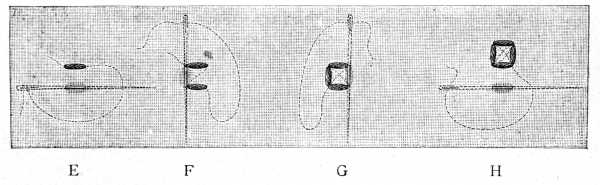
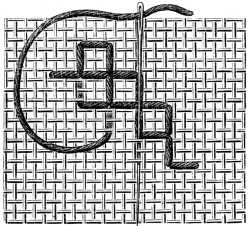
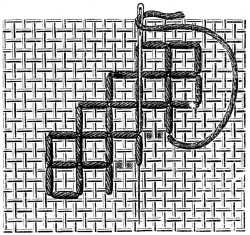
Cross stitch forming a square at the back (figs. 298 and 299).—Many of the alphabets we so admire in old samplers are worked in cross stitch, that forms a square at the back. Each stitch has to be finished off before another is begun; if you carefully examine figs. 298 and 299, which show severally the right and the wrong sides of the stitch, you will find no difficulty in mastering it. Letter A, fig. 296, shows the entrance of the thread, the position of the needle for half the cross stitch on the right side, and the second side of the square at the back, as shown in fig. 299, A. Letter B, fig. 298, shows the cross stitch finished, and the position of the needle for the third side of the square on the wrong side, indicated by the same letter in fig. 299. C, in both figures, indicates a stitch which is double on the right side, and on the wrong side forms the fourth side of the square, whilst letter D, explains how to continue the stitches.
Two-sided Italian stitch (figs. 300, 301, 302, 303).—Two-sided Italian stitch consists of cross stitches, alike on both sides, divided from each other by horizontal and vertical stitches. The upper and lower stitches should all slope one way, as in plain cross stitch.
Italian stitch is worked in one journey, to and fro. Fig. 300 shows how to fasten in the thread, and place the needle for the first stitch, from right to left; fig. 301, the position of the needle from left to right, to form the cross at the back, and the vertical stitch to the left, on the right side; fig. 302, the position of the needle, for a two-sided horizontal stitch at the bottom of the cross, where upon you proceed as in fig. 300. Fig. 303 explains the return of the thread, which completes the double crosses and the lines between.
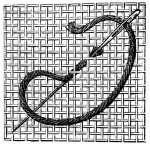 Fig. 300. Two-sided italian stitch. Introduction of the
thread and position of the needle for the first stitch.
Fig. 300. Two-sided italian stitch. Introduction of the
thread and position of the needle for the first stitch.
 Fig. 301. Two-sided italian stitch. Position of the needle
for the 2nd and 3rd stitches.
Fig. 301. Two-sided italian stitch. Position of the needle
for the 2nd and 3rd stitches.
The horizontal lines, not made on the first journey, are added on the way back. In conclusion, pass the needle back, horizontally, from left to right, to make the final stitch over the cross, and then make the stitch between, as shown in fig. 303. On a thin stuff, this stitch produces an extremely pretty effect, resembling lattice-work, provided the thread be tightly drawn in the working.
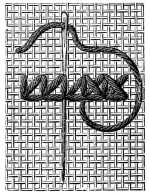 Fig. 302. Two-sided italian stitch. Position of the needle
for the 4th and 5th stitches.
Fig. 302. Two-sided italian stitch. Position of the needle
for the 4th and 5th stitches.
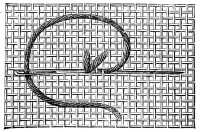 Fig. 303. Two-sided italian stitch. Return journey, which
completes the cross stitch.
Fig. 303. Two-sided italian stitch. Return journey, which
completes the cross stitch.
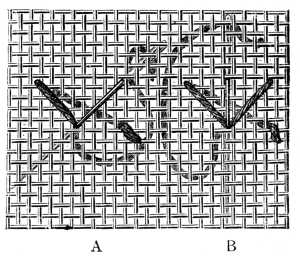
Montenegrin cross stitch (figs. 304, 305, 306).—The Slavonic tribes of the southern districts of E. Europe, especially the Montenegrins, have a great partiality for this stitch, which has been rarely noticed, hitherto, in books on needlework. The right side shows cross stitches with a double thread underneath, and divided by vertical stitches; the wrong side, regular cross stitches, also divided by vertical stitches. Coarse cotton should be used for this stitch; it produces a richer effect and not only covers the stuff better, but also the underneath stitch which in the Slavonic work, is entirely hidden by the cross stitches.
Begin, as letter A indicates, with a long, slanting stitch, across 4 and 8 threads, then, bringing your needle back from right to left, under four threads, draw it out, carry it over the first long stitch, and insert it again from left to right, under the first four threads of the canvas. These four stitches finished, proceed to the fifth and sixth, which as B shows, cross the first four, then repeat the first stitch.
The threads that form the stitches on the wrong side, should always be opposed to each other, that is, one cross should lean to the right, the other to the left, as shown in fig. 305. This variation in the inclination of the stitches, which is regarded as a fault in plain cross stitch, is indispensable here, and produces a charming effect on the wrong side.
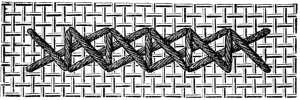
Plaited Algerian stitch (fig. 307).—The distinguishing feature of this stitch is, that it only advances one thread at a time. It should be begun on an uneven number of threads, and like the Montenegrin stitch, should be worked with coarse cotton. The rows may touch, either at the top or at the bottom of the stitch, so long as you keep to one plan throughout.
Two-sided Spanish plaited stitch (figs. 308 and 309).—This stitch has the advantage of being, not only very effective, but also very quickly executed. It is worked in two rows, forwards and backwards. All cross stitch patterns can be worked in Spanish stitch. The gaps, which are occasioned by the long stitches, have to be filled in with short ones. In itself, the stitch consists of slanting stitches, three threads a part, alike on both sides, and advances three threads at a time, as shown in figs. 308 and 309.
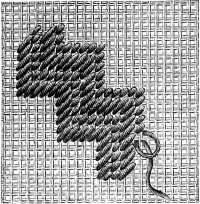
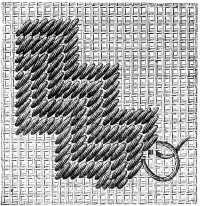
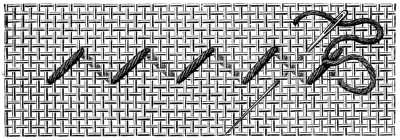
Two-sided line stitch (figs. 310 and 311).—Square stitch, Holbein stitch, line, or stroke stitch, as it is sometimes called, and setting stitch, are all worked on one principle. Though all these two-sided stitches are related to each other, and by no means difficult of execution, those new to the work will find a little practice necessary, to make the stitches follow in their proper order. Fig. 310 explains how the needle has to pass, alternately, step by step, over and under the threads of the stuff, and fig. 311, how the threads, left blank the first time, are covered on the way back. The great difficulty is how to place your first row of stitches so as to ensure an unbroken course back. It is as well before setting out, to ascertain clearly the most direct course back, so that you may not come to a stand-still, or be obliged to make unnecessary stitches on the wrong side. If you have to pass obliquely across the stuff, as in patterns figs. 326, 327, 328, 329, 331 and 333, proceed in the same way as though you were covering the straight threads of a fabric.
Two-sided insertion (figs. 312, 313, 314, 315, 316, 317, 318).—We conclude this series of stitches with a description of a pretty, two-sided insertion, suitable for joining stripes of work of different widths together. In pieces of old needlework, we often find handsome, coloured patterns, joined together by a piece of lace or some quite different kind of work. The insertion represented in fig. 317, is a very good substitute for either. Fig. 312 explains the first stitch and the course of the second, from left to right, under 3 vertical and 3 horizontal threads; the 3rd stitch to the left, over 6 vertical threads, and the beginning of the 4th stitch. Fig. 313 shows the 4th stitch completed, and the direction the 5th and 6th stitches have to take; fig. 314, the 6th completed, and the position of the needle for the 7th and 8th; fig. 315, the 9th lower, horizontal stitch, over 6 vertical threads, the 10th backward stitch, and the position of the needle for the 11th and last stitch. Fig. 317 represents a whole series of stitches, and fig. 318, the back of the work, which though quite a different pattern, will combine very well with any two-sided embroidery.
These insertions can be worked on any stuff, but the stitches, must be done, both ways, on a number of threads, divisible by 3. Thus, the first stitch may cover 6, 9, or 12 threads, but never 8, 10, 12 or 14. [Transcriber's note: 12, here, appears to be an error in the original.]
Gothic borders in Gobelin and cross stitch (figs. 319 and 320).—We are indebted for both these pretty patterns, which are quite Gothic in their character, to a visit we paid to the national museum at Munich, where we discovered them amongst a heap of other old valuables, lying un-heeded in a remote corner. Their simple graceful outlines render them peculiarly suitable for the decoration of table-cloths, counterpanes, curtains, etc. All embroideries of this kind should be finished off with a deep fringe, made in the stuff itself, or knotted on to it or may be trimmed with a heavy thread lace, of a wide width, corresponding with the work in character.
 Fig. 319. Gothic border in cross stitch.
The design may be worked either in one shade, as in fig. 319, or in two, as in fig. 320, where all the outside stitches are worked in the darker shade of the given colours.
 Fig. 320. Gothic border in cross stitch.
Powdering and border. Albanian subjects (figs. 321 and 322).—The arrangement of colours for these charming patterns, of Albanian origin, should be as follows; the dark-coloured crosses, red, the lighter ones, alternately blue and green, the lightest, yellow.
 Fig. 321. Powdering. Albanian subject.
In fig. 321, most of the stitches in every other diagonal row, are worked in red, the others in green or blue; in the intermediate rows the flowers are worked alternately, in green and red, or blue and red, and throughout, the centre of each figure should consist of 4 stitches in yellow.
 Fig. 322. Albanian subject.
In fig. 321, which serves as a border to the above, only the stalks of the 4 conventional pinks, which, with the cross in their middle, form a square, are in brown.
These squares are separated from the bottom border by an insertion, in Gobelin stitch, worked over 6 threads, in red, blue, green and yellow, from 20 to 25 stitches of each. This band is edged on both sides with a row of stem stitches, worked in yellow over 4 threads. The Holbein stitches that border the band, can be made in whichever colour the worker prefers, or else in red and gold thread.
Borders in stroke stitch (figs. 323, 324, 325).—These three patterns will give our readers an opportunity of perfecting themselves in two-sided, square stitch (see figs. 310 and 311), also called stroke, or line stitch, according as it is worked, in oblique, or straight rows.
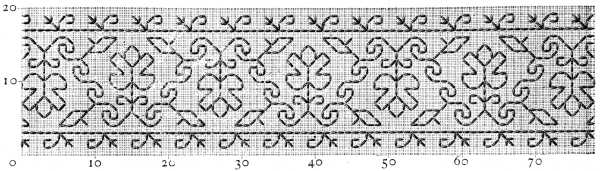 Fig. 323. Border in stroke stitch.
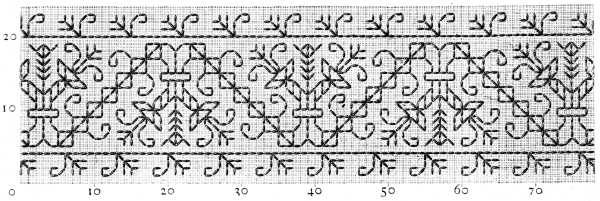 Fig. 324. Border in stroke stitch.
 Fig. 325. Insertion in stroke stitch.
We again recommend our readers, to begin by ascertaining the course the stitches should take, in order to avoid all unnecessary stitches and be sure of finding their way back according to the prescribed rule.
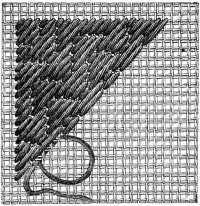
Corners in stroke stitch (figs. 326 and 327).—These pretty little patterns are suitable for the decoration of ladies' and children's collars, fine pocket-handkerchiefs and finger napkins, and can be worked in one or two colours, as preferred. If two colours be used, the darker should be taken for the interior, the lighter for the narrow outside edge.

Stripe in stroke stitch (fig. 328).—This is copied from a piece of Italian work, though from a resemblance in the different subjects to the rose, thistle and shamrock, if might have been supposed to be of English origin. The original work was executed in a most brilliant purple red which time has toned down to the colour of Jaune-Rouille 308, or Brun-Cuir 432, one or other of which we recommend, as being the only colours with which any thing approaching the refined distinguished look of the old embroidery, can be given to the new.
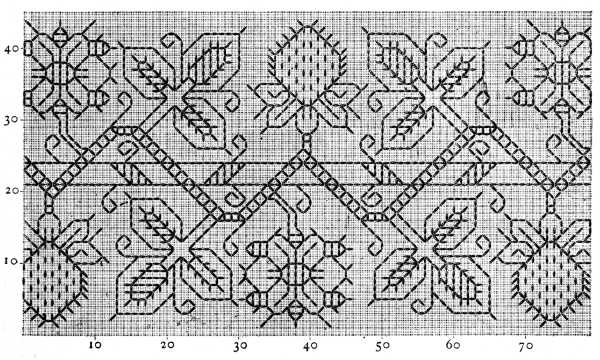 Fig. 328. Stripe in stroke stitch.
Grounding in diagonal lines (fig. 329).—This pattern can be worked, in any of the previous stitches, or in back-stitch. It is only suitable for large surfaces, on account of the diagonal lines, and should be worked, all in one colour. It can be varied by adding sprays to the upper sides of the slanting stalks, like those on the lower sides, turned either the same way, or upwards. Skilled workers will readily contrive the middles for themselves, by combining the different subjects and putting them together in various positions, either diagonally or at right angles to each other, with the help of the Penelope mirror.[1]
 Fig. 329. Grounding in diagonal lines.
Powdering in cross, stroke and star stitch (fig. 330).—This charming combination of cross, stroke and star stitches, can be made use of wherever embroidery is available as a means of decoration.
 Fig. 330. Powdering in cross, stroke and star stitch.
The cross stitches, in which the solid parts of the pattern are worked, should be in one colour only, the stroke and star stitches, in Chiné d'or D.M.C. [A]
Border in Greek stitch (fig. 331).—All the darker lines here, should be worked in black, colour 473, the leaves in the form of steps, alternately in light and dark red up to the stalks, the line of demarcation being indicated by the different direction of the stitches, so that two light leaves, and two dark leaves, should always face each other.
 Fig. 331. Border in greek stitch.
In the original, the cross bars that unite the leaves, are in yellow, whilst the detached figures that separate them, are worked, those that come between the light red leaves, in pale blue, and those between the dark red ones, in gold thread. The exterior part of the figure is filled in with the different colours, indicated above; with the exception of the small squares in Gobelin stitch, which should all be worked in plain gold, or Chiné d'or D.M.C, green and gold. The SS in the narrow outside border, should be worked in two shades of blue; the outside stitches in colour 341 and the solid parts in colour 668. The little figures with the transverse bars that unite the SS, should be set in black, and filled in, alternately, in light and dark red, and in yellow.
Grounding (fig. 332).—This grounding was copied from a beautiful old cushion-cover and will be found particularly useful in the confection of small embroidered articles, because the pattern will always form a centre point in itself. A light, brilliant red, such as either of the two colours indicated beneath the figure, will best reproduce the tone of the original.
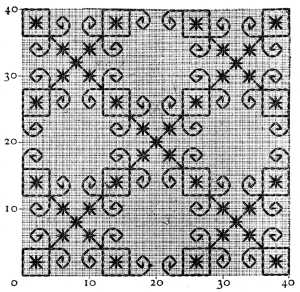 Fig. 332. Grounding.
In making the little stars that connect the different squares, the mode we recommended for working stroke stitch should be adopted, that is, beginning, by bringing the needle out in the middle, making 7 stitches, and at the eighth, carrying the needle back under the first, to the spot whence you started. The stitches will then be alike on both sides.
Wallachian border (fig. 333).—A piece of Wallachian needlework, executed on rough linen, and uncommon, both in colour and design, suggested the charming embroidery, here represented. In place of the somewhat violent colours, which indicate an undeveloped taste, we have substituted softer and more refined ones. All the stroke stitches of the middle stripe and of the two border stripes, top and bottom, as well as the darker portions of the small dice, subdivided into eight, in the bottom border, and of the small diagonal squares in the top border, worked in Gobelin stitch, are in red, colour 346. The setting of upright stroke stitches round the large centre figures, as well as the straight lines that divide these same figures into four, are worked in yellow, colour 680.
 Fig. 333. Wallachian border.
The squares and the half-squares are worked in colour 326, green 319, and gold thread; colour 326 is indicated in the illustration by the darkest shade, green 319, by the medium shade, and the gold thread by the lightest shade.
The stitches in the right bottom quarter and top left one, incline upwards from left to right, in the two other quarters they incline the contrary way. The Spanish half-stitch as shown in fig. 309, can only be done over 4 and 2 threads and worked one way, not to and fro.
The general effect is very much heightened by the introduction of one or two rows of stitches, worked in gold thread, into the straight lines on either side of the stripes; all the light parts of the design moreover, should be worked in gold thread.
Borders in several shades of one colour (figs. 334 and 335). In some beautifully embroidered Chinese hangings, that latterly came under our notice, the principal subject was the figure of a mandarin, in a very richly decorated dress. The pretty pattern, given in fig. 334, was copied from the collar and cuffs of this dress. We should advise working it in several shades of pink or red, or in a single one of the colours indicated above.
 Fig. 334. Border in several shades of one colour.
The border of these hangings furnished us with pattern 335, which will be found to look best, worked in three very distinct shades of blue.
The grotesque heads of animals, and the flowers and branches which break the running pattern, and are a Chinese speciality, distinguish this design from the more conventional patterns of the present day.
We recommend these two pretty patterns, to our readers notice, as likewise adaptable by transposition, to centres, or by repetition, to broad stripes. With very little trouble they can be converted, into a variety of subjects, such as it is often difficult to find ready made, and exactly suited to the purpose in hand.
Border in Greek stitch with a footing, composed of branches (fig. 336).—This design can be worked in Greek, Slavonic, Montenegrin, or plaited Algerian stitch. Our illustration worked in Greek stitch, shows how one stitch encroaches upon another, and how the thread is carried from one isolated stitch, to another.
It will be found to be an improvement if the stitches are so made as to follow the direction of the lines. The central subject may be repeated two or three times, according to the width of border required. The edging is the same throughout. The use of the 'Penelope mirror' for repeating patterns is described in the concluding chapter of the book.
Table-cover in Gobelin and stroke stitch (figs. 337, 338, 339, 340).—This tasteful little table-cover provides excellent practice in working two sided, square stitch. The square represented in fig. 339, forms the middle of the cloth. The Gobelin stitches, set very closely, unite and form a star in the centre of the principal subject. They begin in the corners, in red and continue in green, violet and blue, successively; the little branches in stroke stitch, on each side of the Gobelin stitches, correspond with them in colour, and the small figures, that form the border of the square, may be worked, indiscriminately, in any of the colours used for the Gobelin stitches of the centre. Four branches run inwards from the corners of the square, and four more advance to meet, and pass them, from the inner angles of the wide border. Four figures, copied from the outside border, fig. 339, and worked in yellow, and the little star, fig. 337, besides the little subjects, borrowed from the outside border, fig. 338, are strewn lightly over the foundation, interspersed between the branches. In fig. 340, nevertheless, which represents the whole table-cover, the edge is formed of the small subjects contained in the wide border and not of the little stars. The Gobelin stitches in the centre of fig. 337, are in dark green, the star stitches and the stroke stitches on the outside in red. The wide border consists of stars, every other row of which, is worked in red; the intermediate rows, successively, in blue, green, and yellow. The corners are composed of four detached stars, framed by a row of stroke stitches, one red and one blue, alternately. This line skirts both sides of the border, and forms the base to the quaint figures, that terminate the design and which can be worked in all the colours used for the inside.
The original of our illustration, which is on fine Rhodes linen, in Coton à broder D.M.C No. 25, is only a small table-cover; for a larger one, if you wish strictly to adhere to the pattern, Java or Ceylon linen will be the best material to select, with Coton à tricoter D.M.C No. 12, for the stroke stitches and Coton à repriser No. 25 for the Gobelin stitches.
 Fig. 340. Table-cover in gobelin and stroke stitch.
[1] See, the directions for its use, given in the concluding chapter.